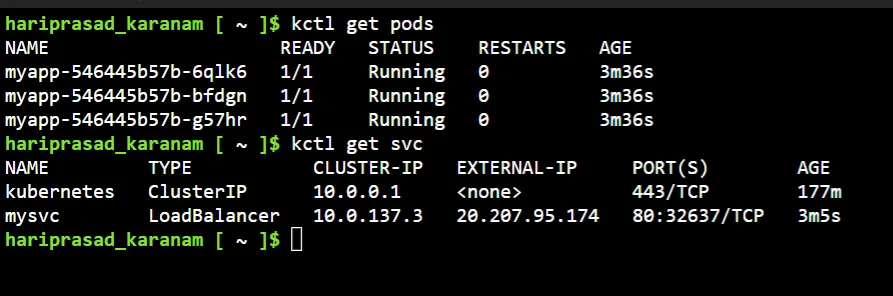
In the previous article, we saw ReplicaSet, Services and touched base on deployment. In this article, we will explore deployments in more detail.
As we already created deployments using the cmd line, here we’ll use yaml. We’ll combine replicaset and service config with the deployment config.
Note: kctl is an shell alias for kubectl
apiVersion: apps/v1
kind: Deployment
metadata:
 name: mywebapp
 annotations:
  kubernetes.io/change-cause: "initial deployment"
spec:
 replicas: 3
 selector:
  matchLabels:
   app: data
 template:
  metadata:
   labels:
    app: data
  spec:
   containers:
   - name: prodapp
     image: quay.io/gauravkumar9130/production:v1
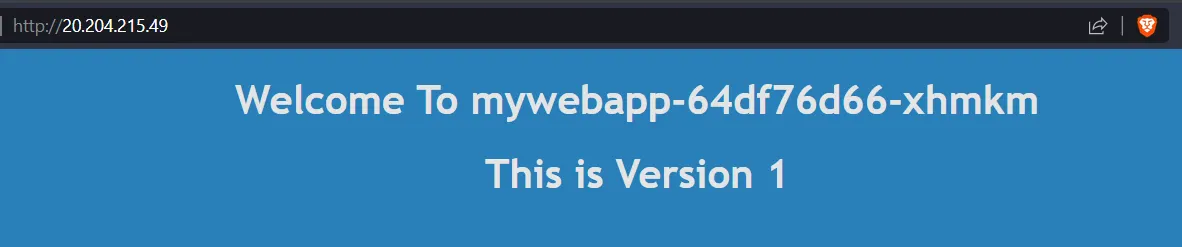
Apply the deployment and expose the service with the load balancer type. (using the cmd line, for now, will merge later).
kctl expose deployment mywebapp --target-port=80 --port=80 --type=LoadBalancer
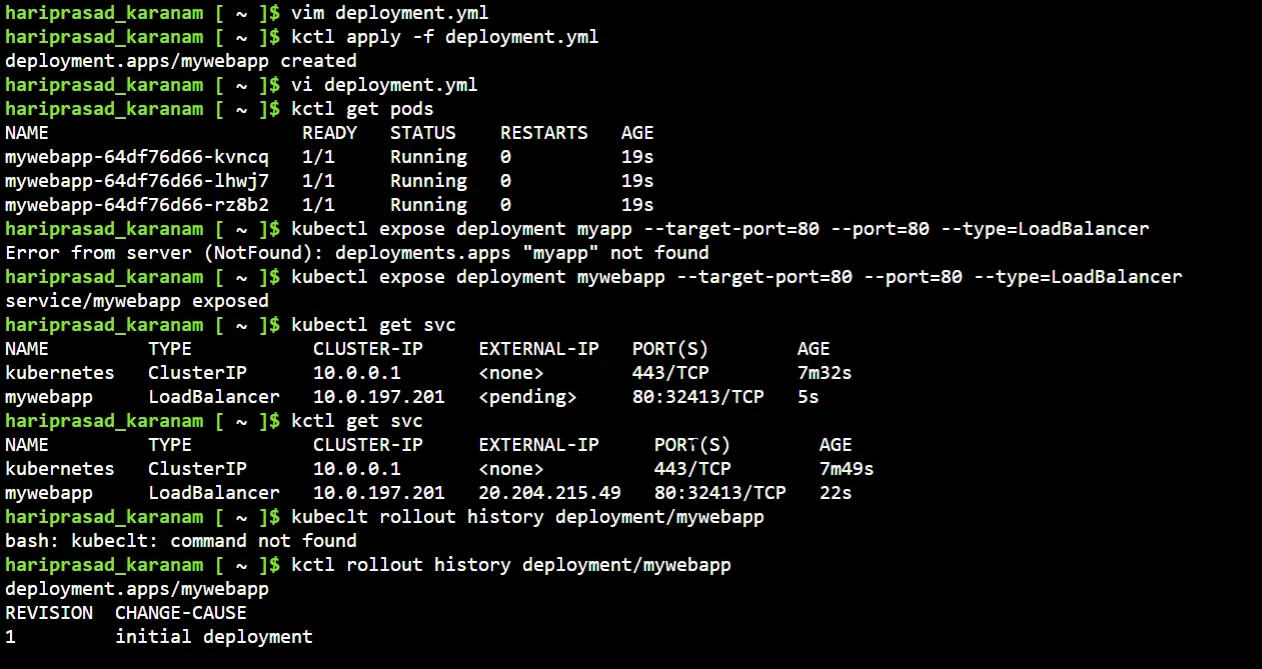
We have 3 replicas here and since we have public ip, we can see our app with load balancing among 3 pods.
Note the version of the application here.

Kubectl rollout history lets us see the history of deployments and since we have defined change cause in our config, we can see that getting listed in history.
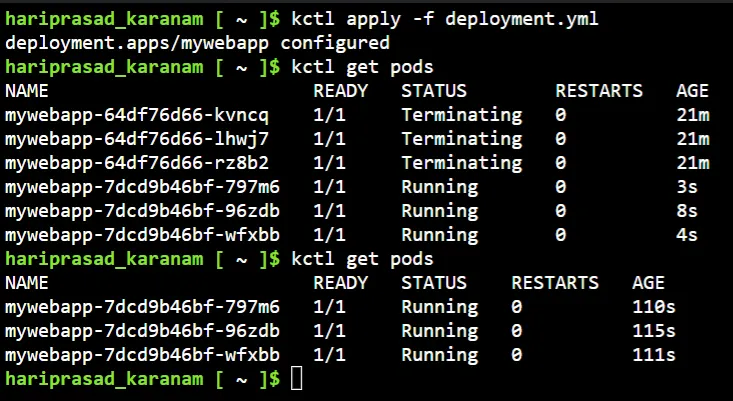
Let’s see the ways to update our deployment. Remember that version 1 above, will now set version 2 of the image. We can do this by using the command line, but it’s better and recommended to modify the yml and reapply.
metadata:
 name: mywebapp
 annotations:
  kubernetes.io/change-cause: "updated to v2"
---------------------------------
containers:
   - name: prodapp
     image: quay.io/gauravkumar9130/production:v2
There are 2 more ways to update the deployment:
- using command line “kubectl set image deployment”
- using kubectl edit
1> kubectl set image deployment/<dep name> <containername>=<imagename>  --record
2> kctl edit deployment/<dep name>
Ok, now apply the config.
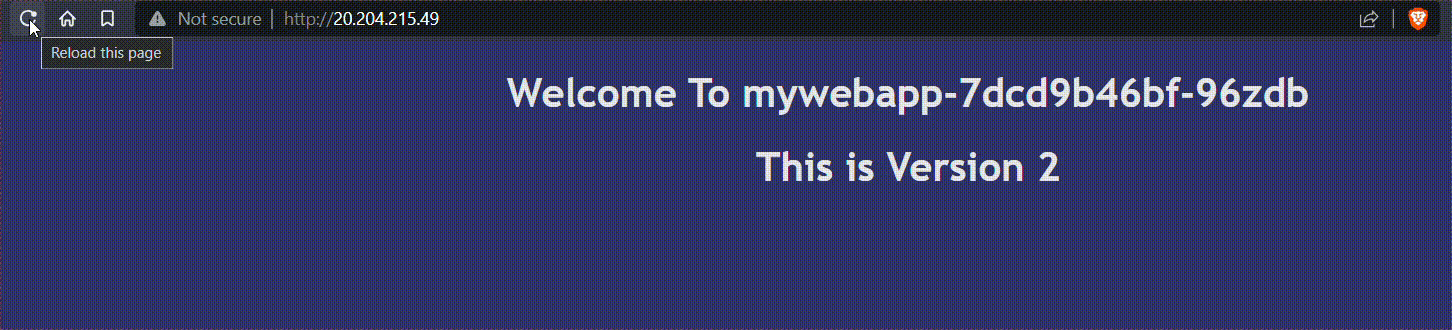
Browsing our application, we can see the v2 appearing.
I have updated the application 2 more times and now it’s set to V4.
$kctl rollout history deployment/mywebapp
deployment.apps/mywebapp
REVISION  CHANGE-CAUSE
1         initial deployment
2         updated to v2
3         updated to v3
4         updated to v4
Rollback
We can also undo deployment to roll back to the previous version of our application in case of any requirements.
Rollout undo goes back to the previous version of the deployment by default. If we want, we can also set the version by providing the revision number.
$ kctl rollout undo deployment/mywebapp
deployment.apps/mywebapp rolled back
$ kctl rollout history deployment/mywebapp
deployment.apps/mywebapp
REVISION  CHANGE-CAUSE
1         initial deployment
2         updated to v2
4         updated to v4
5         updated to v3
$ kctl rollout undo deployment/mywebapp --to-revision 1
deployment.apps/mywebapp rolled back
$ kctl rollout history deployment/mywebapp
deployment.apps/mywebapp
REVISION  CHANGE-CAUSE
2         updated to v2
4         updated to v4
5         updated to v3
6         initial deployment
Deployment Strategies:
A Deployment strategy defines how to create, upgrade, or downgrade different versions of our applications in k8s.
There are different strategies such as rolling update, blue-green, recreate and canary.
Blue-green deployment:
In this type of deployment, our existing app is considered blue and the new app is considered green.
We deploy the new app while the old app is also still running, however, we don’t point the service to the new app. We do all the testing with the new app and once we see everything is fine, we can redirect service to the new app. Now all the users accessing the app will see the updated app. We can delete the old deployment now.
# blue.yml
apiVersion: apps/v1
kind: Deployment
metadata:
 name: myapp
spec:
 selector:
  matchLabels:
   app: old
 replicas: 3
 template:
  metadata:
   labels:
    app: old
  spec:
   containers:
   - name: prod-app
     image: quay.io/gauravkumar9130/production:v1
-------------
#blue-green-svc.yml
apiVersion: v1
kind: Service
metadata:
 name: mysvc
spec:
 type: LoadBalancer
 ports:
 - targetPort: 80
   port: 80
 selector:
  app: old
Now create the deployment and service.
We have our v1 running fine.
At this point, our v2 of the application is ready and is deployed with another yml (green.yml).
#green.yml
apiVersion: apps/v1
kind: Deployment
metadata:
 name: myapp-v2
spec:
 selector:
  matchLabels:
   app: new
 replicas: 3
 template:
  metadata:
   labels:
    app: new
  spec:
   containers:
   - name: prod-app
     image: quay.io/gauravkumar9130/production:v2
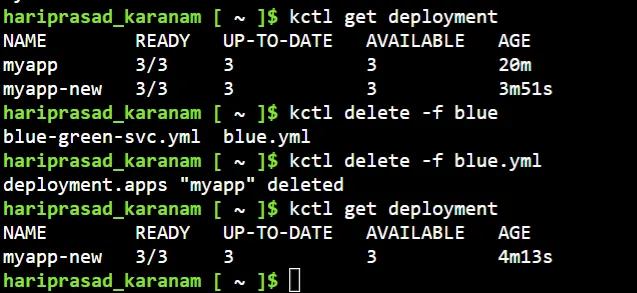
Apply this deployment, and our pods are created but we’ll still see the v1 of the application in our browser. This is because the service is still mapped to the previous deployment.
Let’s update it to serve the green deployment now. To do so we just need to change the selector at the end to “new” and apply it.
# blue-green-svc.yml
selector:
  app: new
Now refresh the webpage and we shall see v2. So essentially we updated our application without any downtime. We can now delete the blue.yml deployment.
Canary deployment:
In this strategy, we use a progressive delivery approach, with one version of the application serving most users, and another, newer version serving a small pool of test users. The test deployment will be rolled out to more users after verifying everything.
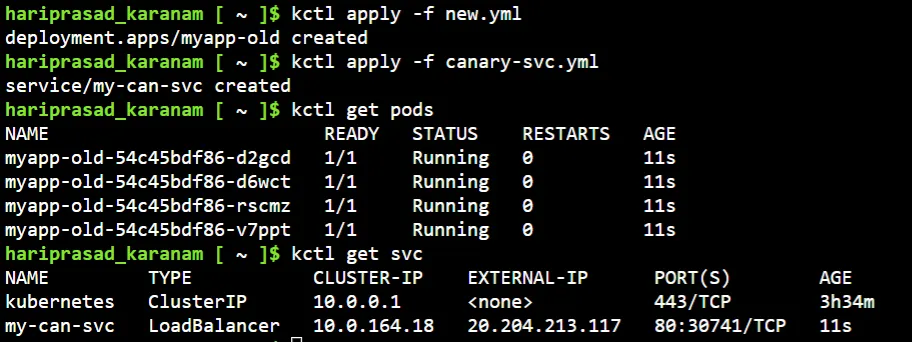
Example: Will create a deployment(old) with v1 of the application and with 5 replicas. When v2 is ready, we’ll scale down the deployment (old) to 3 and create another deployment with the v2 image and 1 replica.
The service will not be changed, but it will load balance the 4 replicas.
# new.yml
apiVersion: apps/v1
kind: Deployment
metadata:
 name: myapp-old
spec:
 selector:
  matchLabels:
   app: myapp
 replicas: 4
 template:
  metadata:
   labels:
    app: myapp
  spec:
   containers:
   - name: prod
     image: quay.io/gauravkumar9130/production:v1
---------
# canary-svc.yml
apiVersion: v1
kind: Service
metadata:
 name: my-can-svc
spec:
 type: LoadBalancer
 ports:
 - targetPort: 80
   port: 80
 selector:
  app: myapp
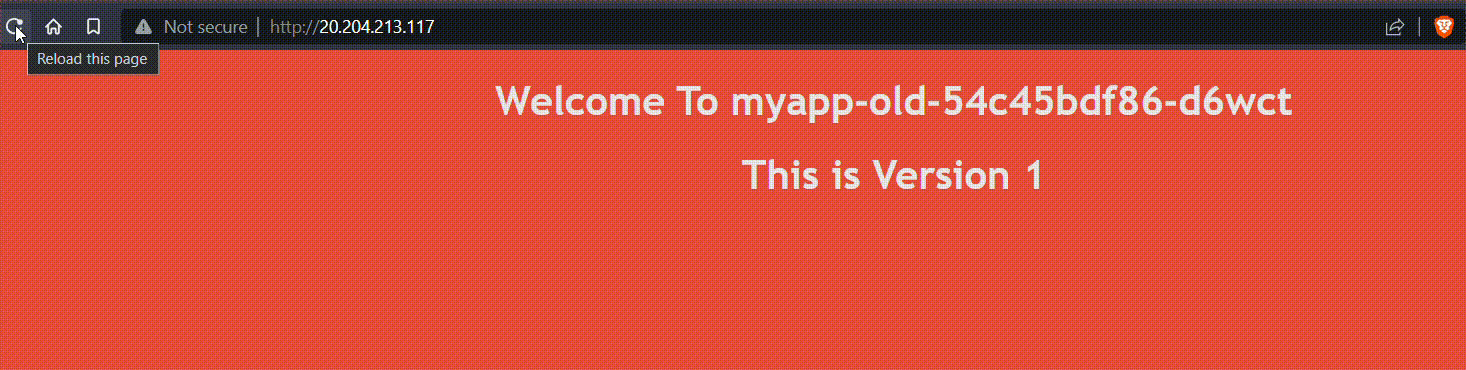
And apply. both the config. Now we can see v1 of the app in the browser.
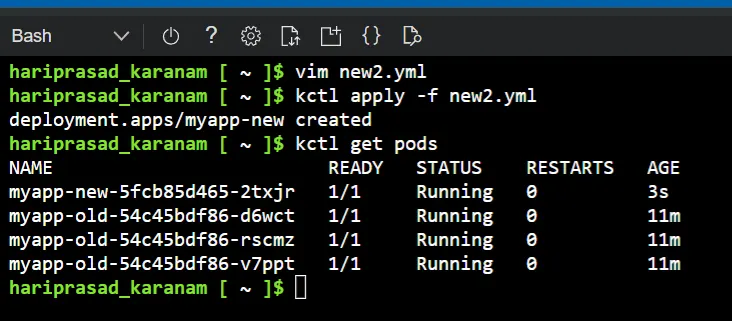
Now to scale down this deployment and apply the new v2 app.
# new2.yml
apiVersion: apps/v1
kind: Deployment
metadata:
 name: myapp-new
spec:
 selector:
  matchLabels:
   app: myapp
 replicas: 1
 template:
  metadata:
   labels:
    app: myapp
  spec:
   containers:
   - name: prod
     image: quay.io/gauravkumar9130/production:v2
We don’t need to change anything in the service config.
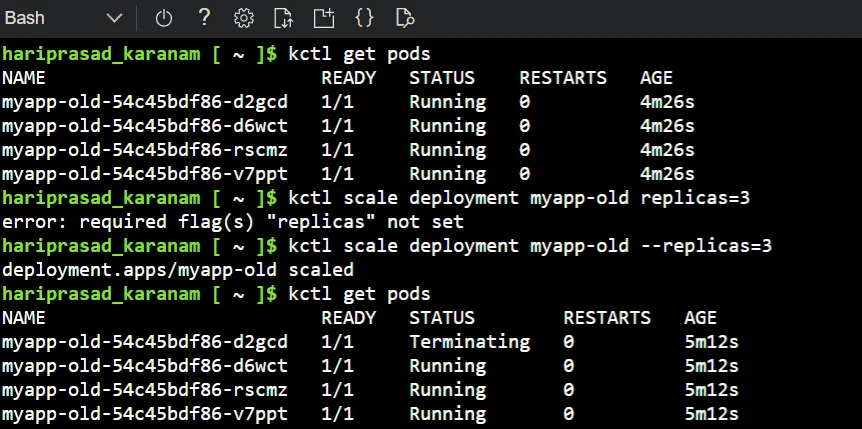
Apply the new config. Now we have 3 pods from the old app and 1 from new one.
Try browsing the app.
Rolling Update:
The Deployment updates Pods in a rolling update fashion when we set the .spec.strategy.type==RollingUpdate. We can specify how the updates are carried out with maxUnavailable and maxSurge.For example, if we have 4 replicas, and we want to have 25% to be new, then the pods will go one by one.
# rolling-update.yml
apiVersion: apps/v1
kind: Deployment
metadata:
  name: nginx-deployment
  labels:
    app: nginx
spec:
  replicas: 4
  selector:
    matchLabels:
      app: nginx
  minReadySeconds: 5
  strategy:
    type: RollingUpdate
    rollingUpdate:
      maxSurge: 1
      maxUnavailable: 1
  template:
    metadata:
      labels:
        app: nginx
    spec:
      containers:
      - name: nginx
        image: nginx:1.24
        ports:
        - containerPort: 80
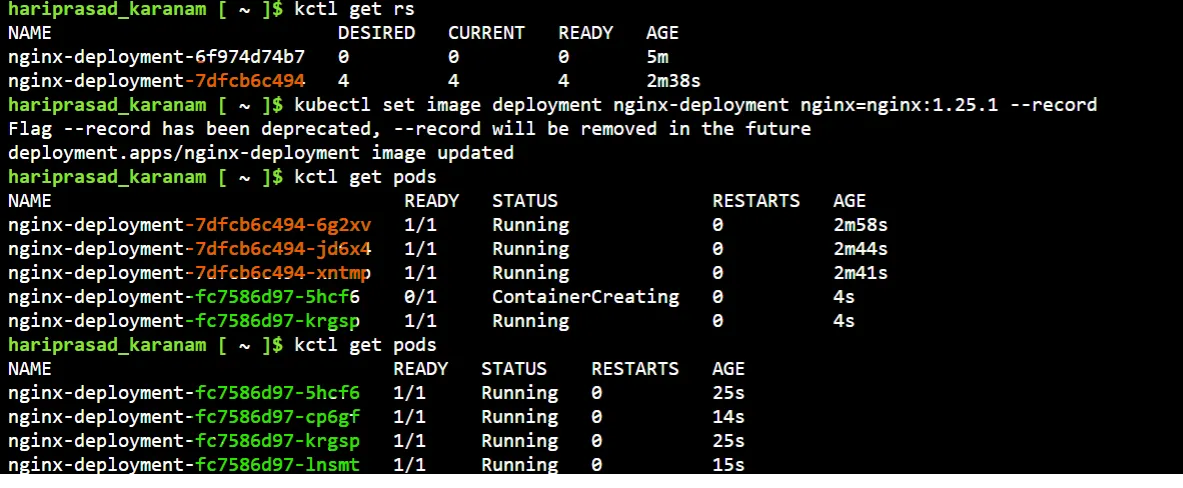
Apply the config. Check pods and replicaset. Now we’ll update the deployment with #nginx:1.25 and will check the pod’s status. Will see new pods getting generated one by one. We will be able to differentiate the pods based on replicaset name.
kubectl get rs
NAME                          DESIRED   CURRENT   READY   AGE
nginx-deployment-6f974d74b7   0         0         0       15m # from first deployment
nginx-deployment-7dfcb6c494   0         0         0       13m # the first update
nginx-deployment-fc7586d97    4         4         4       10m # after 2nd update
Recreate:
This strategy removes all existing pods in the existing ReplicaSet first then creates new pods in the new ReplicaSet.
 spec:
  replicas: 3
  strategy:
    type: Recreate
This is a wrap of deployments in K8s. Thanks for reading.