

Preface
The goal of this project is to understand how the major building blocks of modern identity and access management fit together rather than to compare products. The technologies chosen here are representative, not exclusive:
OpenLDAP provides a traditional enterprise directory. Keycloak represents a self-hosted Identity Provider. Okta represents a managed cloud Identity Provider. Grafana acts as a real application consuming identity through OpenID Connect.
Most of these components are interchangeable. For example, Active Directory could replace OpenLDAP, Authentik or Microsoft Entra ID could replace Keycloak or Okta, and any OpenID Connect-enabled application could replace Grafana. The concepts—directory services, identity federation, authentication, token issuance, and authorization—remain the same.
Project Overview
Goal: stand up a working identity and access management stack from first principles: a real LDAP directory, an open-source Identity Provider (Keycloak) federated from it, a commercial Identity Provider (Okta) running alongside it, and a real application (Grafana) authenticating through both — with group-based authorization determining what each user can actually do.
Stack:
- Directory: OpenLDAP + phpLDAPadmin (web UI)
- Identity Provider (self-hosted): Keycloak + Postgres
- Identity Provider (commercial): Okta
- Application: Grafana
- Infrastructure: 3× AWS EC2 (Ubuntu 22.04), a real domain, Caddy for automatic TLS
Architecture:
ldap.yourdomain.com     →  EC2 #1  →  OpenLDAP (native slapd) + phpLDAPadmin (Docker)
auth.yourdomain.com     →  EC2 #2  →  Keycloak (Docker, production mode) + Postgres
grafana.yourdomain.com  →  EC2 #3  →  Grafana (Docker), OIDC via both Keycloak and Okta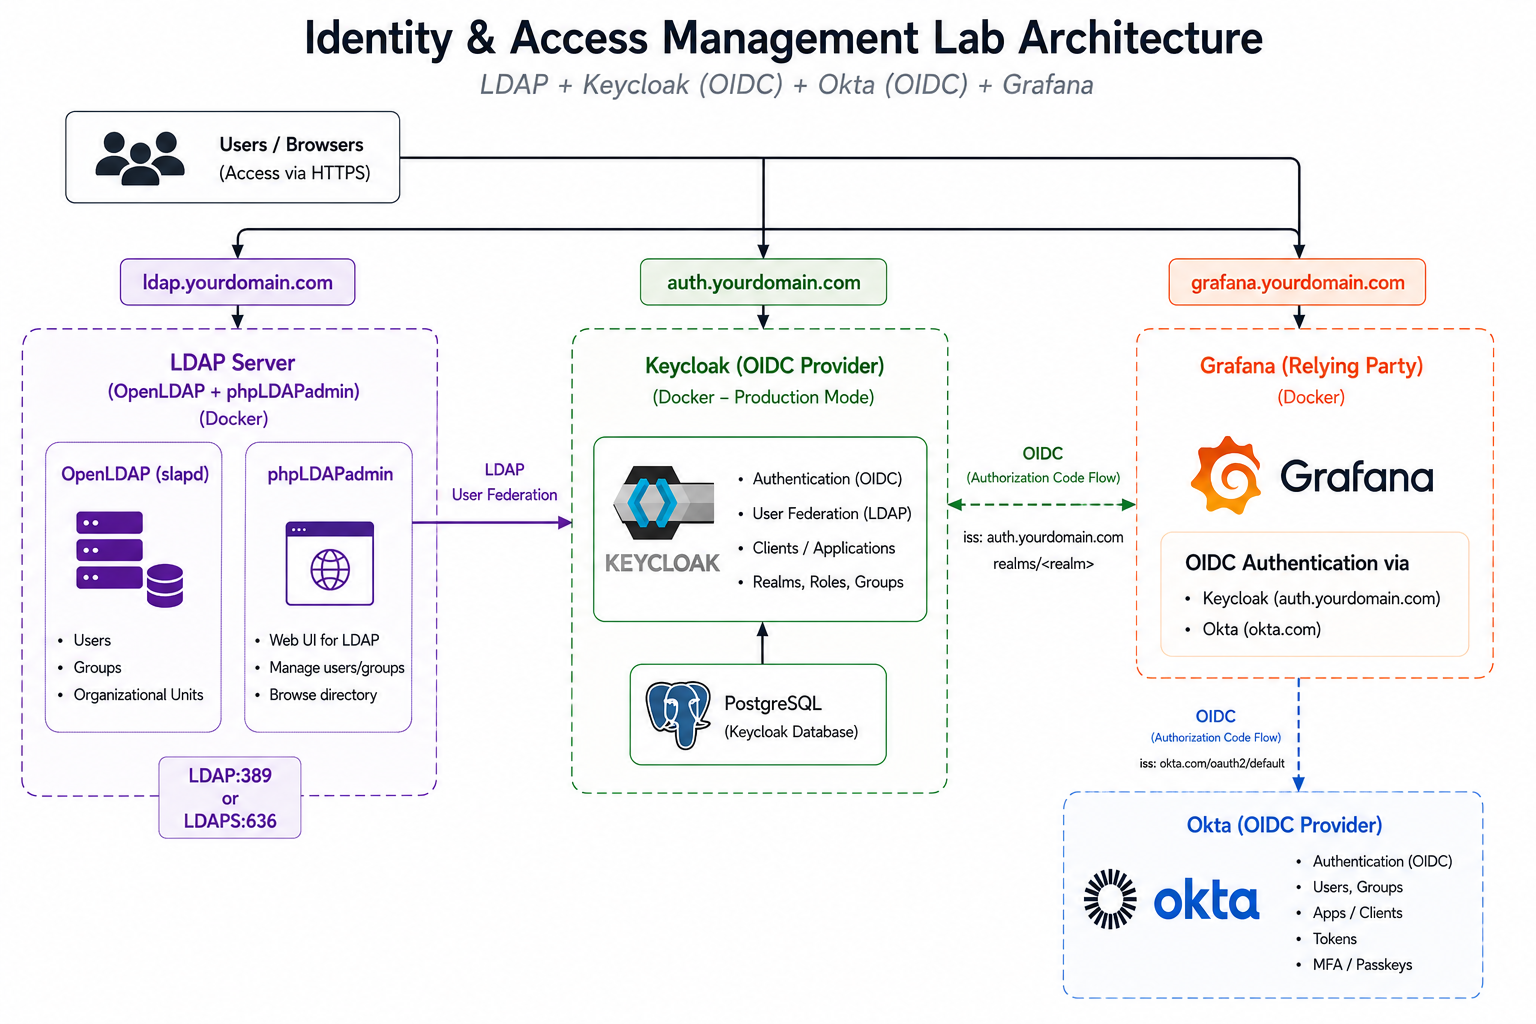
The Vocabulary — Authentication, Authorization, and the Alphabet Soup
Before touching any tools, it’s worth defining a few terms that are often used interchangeably but solve different problems.
Authentication vs Authorization
There are two fundamental questions every application needs to answer:
Authentication — Who are you? Proving your identity using something like a password, passkey, or biometric authentication.
Authorization — What are you allowed to do? Determining what actions you’re permitted to perform after your identity has been verified.
A concert analogy that has always stuck with me:
- Showing your ticket at the entrance → Authentication
- The color of your wristband determining which areas you can enter → Authorization
The Building Blocks
| Technology | What it solves |
|---|---|
| Local users | Every application manages its own usernames and passwords. Simple for one application, but difficult to scale. |
| LDAP | A centralized directory that stores users and groups so multiple applications can share the same identities. |
| SSO (OIDC / SAML) | Users authenticate once with a central Identity Provider, and applications trust the resulting identity instead of verifying passwords themselves. |
| WebAuthn / Passkeys | A modern authentication method that replaces passwords with cryptographic credentials protected by biometrics or security keys. |
Note: This guide focuses on OpenID Connect (OIDC) because it is the preferred protocol for modern web and cloud-native applications. While SAML 2.0 remains widely used in enterprise environments, its concepts are similar enough that covering both would add unnecessary duplication.
LDAP Naming Vocabulary
LDAP uses a hierarchical naming structure that appears throughout this guide.
| Term | Description |
|---|---|
| DN (Distinguished Name) | The complete, unique path to an LDAP entry.cn=john doe,ou=people,dc=lab,dc=local |
| CN (Common Name) | The name of an individual object, such as a user or group. |
| DC (Domain Component) | Components of the directory’s domain name.lab.local → dc=lab,dc=local |
| OU (Organizational Unit) | A logical container used to organize users, groups, and other objects. |
| UID (User ID) | Typically the user’s login name. |
Where Kerberos Fits
LDAP and Kerberos are frequently mentioned together, but they solve different problems.
- LDAP is a directory service. It stores information about users, groups, and other directory objects.
- Kerberos is an authentication protocol. It issues time-limited tickets that allow users to prove their identity without repeatedly transmitting passwords across the network.
Active Directory combines both technologies, which is why they’re often confused. LDAP provides the directory, while Kerberos provides the authentication mechanism. They complement each other rather than compete with each other.
Part 1: The Directory — OpenLDAP + a Modern Admin UI
Install OpenLDAP as a native service
Run the directory as a proper OS-level service, not a container — this is core infrastructure meant to run continuously, and it’s how most real organizations actually deploy it.
sudo apt update
sudo apt install -y slapd ldap-utils
sudo dpkg-reconfigure slapdEnter a DNS domain name for the directory — for example lab.yourdomain.com. This becomes your base DN, the root of the entire directory tree: dc=lab,dc=yourdomain,dc=com. Treat this purely as an internal LDAP naming convention; it’s never resolved over the internet, unlike the real subdomains that will point at your actual servers.
Verify the directory is alive:
ldapsearch -x -b "dc=lab,dc=yourdomain,dc=com" -D "cn=admin,dc=lab,dc=yourdomain,dc=com" -WLook for result: 0 Success.
Install a web GUI
OpenLDAP itself has no UI of any kind — slapd is purely a protocol daemon, the same way a database server has no built-in admin panel. Every LDAP GUI is a separate client application that connects to it.
Use the actively-maintained phpldapadmin/phpldapadmin image (a modern Laravel + FrankenPHP rewrite), not the old, abandoned osixia/phpldapadmin most tutorials reference. Connect it to the native slapd process via Docker’s host-bridge networking:
services:
  phpldapadmin:
    image: phpldapadmin/phpldapadmin:latest
    environment:
      LDAP_HOST: "host.docker.internal"
      LDAP_USERNAME: "cn=admin,dc=lab,dc=yourdomain,dc=com"
      LDAP_PASSWORD: "your-admin-password"
    extra_hosts:
      - "host.docker.internal:host-gateway"
    ports:
- "127.0.0.1:8080:8080"host.docker.internal lets a container reach services on its host machine. On native Docker Engine (what EC2 runs, as opposed to Docker Desktop), this requires the explicit extra_hosts line shown above.
Put Caddy in front for automatic TLS
ldap.yourdomain.com {
    reverse_proxy 127.0.0.1:8080
}That’s the entire TLS configuration needed. The moment Caddy sees a real domain name as a site address, it automatically requests a Let’s Encrypt certificate, proves domain ownership, and renews the certificate forever in the background — no certbot, no manual cert file paths, no explicit :443 block.
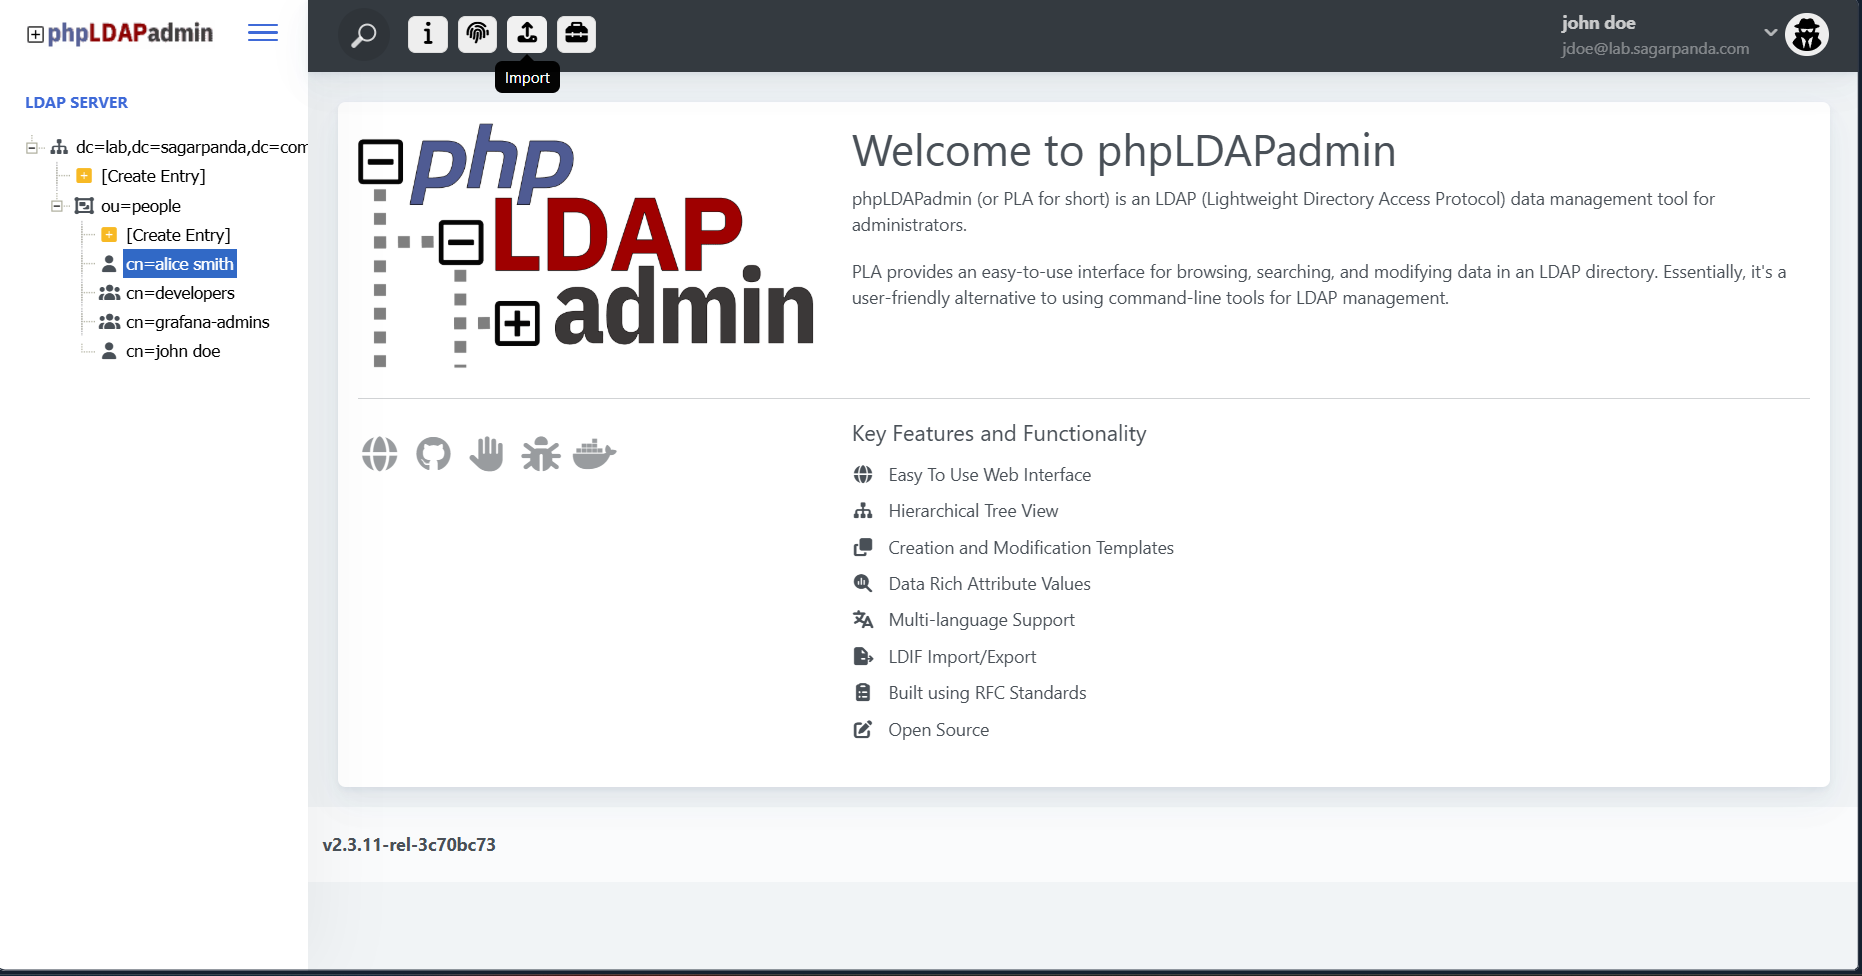
A note on transport security: this setup runs plain ldap:// on port 389 between Keycloak and the LDAP server, encrypted only at the edges by Caddy’s TLS on the web UI — the LDAP protocol itself is not encrypted. For a real production deployment, slapd should be configured for LDAPS (port 636) or StartTLS, so credentials and directory data are encrypted in transit between servers too, not just between the browser and the proxy. Keycloak’s LDAP federation form has an “Enable StartTLS” toggle for exactly this purpose — left off here for simplicity, but worth enabling in any deployment beyond a lab.
Bootstrap the first real user via CLI — don’t try to log in as rootDN
Never attempt to log into a web UI using the rootDN (cn=admin,...). It’s a credential defined directly in slapd’s own config, meant for backend write operations only — it is not a real, searchable entry inside the directory tree. Any web app whose login flow searches for a matching user (as most do) will find nothing and fail, no matter how correct the password is.
Create the first real user directly via LDIF instead:
dn: ou=people,dc=lab,dc=yourdomain,dc=com
objectClass: organizationalUnit
ou: people

dn: cn=john doe,ou=people,dc=lab,dc=yourdomain,dc=com
objectClass: inetOrgPerson
objectClass: organizationalPerson
objectClass: person
objectClass: posixAccount
cn: john doe
sn: doe
uid: jdoe
userPassword: your-password
mail: jdoe@lab.yourdomain.com
uidNumber: 10000
gidNumber: 10000
homeDirectory: /home/jdoe
loginShell: /bin/bashldapadd -x -D "cn=admin,dc=lab,dc=yourdomain,dc=com" -W -f create-jdoe.ldifInclude posixAccount from the start. Most LDAP-aware web apps require this specific objectClass and search by the uid attribute to find a matching login — build the correct schema in from the beginning rather than patching it in after a failed login.
Grant write access to a real admin user
OpenLDAP’s default ACLs grant only the rootDN write access — every regular user, including the one just created, gets read-only by default:
olcAccess: {2}to * by * readGrant jdoe explicit write access by modifying this ACL against the config backend, using the local-only ldapi:/// socket with EXTERNAL SASL auth (reachable only via sudo on the machine itself):
dn: olcDatabase={1}mdb,cn=config
changetype: modify
replace: olcAccess
olcAccess: {0}to attrs=userPassword by self write by anonymous auth by * none
olcAccess: {1}to attrs=shadowLastChange by self write by * read
olcAccess: {2}to * by dn.exact="cn=john doe,ou=people,dc=lab,dc=yourdomain,dc=com" write by * readsudo ldapmodify -Q -Y EXTERNAL -H ldapi:/// -f grant-jdoe-write.ldifFor a real deployment beyond a lab, grant this to a group instead of one hardcoded DN (by group.exact="cn=ldap-admins,..." write), so admin rights scale with group membership rather than requiring an ACL edit for every new admin.
Create users and groups, using both membership mechanisms correctly
Create a second user, asmith, and two groups:
developers(gidNumber10000) — the primary group for both users, set via thegidNumberattribute directly on each user entry. A primary group needs no member list of its own; the link lives entirely on the user side.grafana-admins(gidNumber10010) — a secondary group, which lists its members explicitly viamemberUid: jdoe. This group will drive actual admin permissions in Grafana later.
Query both relationship types:
# Group → members (secondary/explicit membership)
ldapsearch -x -b "ou=people,dc=lab,dc=yourdomain,dc=com" -D "cn=admin,dc=lab,dc=yourdomain,dc=com" -W "(objectClass=posixGroup)" cn gidNumber memberUid

# User → primary group
ldapsearch -x -b "ou=people,dc=lab,dc=yourdomain,dc=com" -D "cn=admin,dc=lab,dc=yourdomain,dc=com" -W "(objectClass=posixAccount)" uid gidNumberWhen creating a user through the web UI, explicitly set the password hash type to SSHA — the default may be set to ARGON2ID, which plain slapd doesn’t support without an extra module, silently preventing that user from ever authenticating.
Part 2: Keycloak — Production Mode, a Real Database, Real Federation
Run Keycloak in production mode with Postgres
services:
  postgres:
    image: postgres:16
    environment:
      POSTGRES_DB: keycloak
      POSTGRES_USER: keycloak
      POSTGRES_PASSWORD: your-db-password

  keycloak:
    image: quay.io/keycloak/keycloak:25.0
    command: start
    environment:
      KC_DB: postgres
      KC_DB_URL: jdbc:postgresql://postgres:5432/keycloak
      KC_DB_USERNAME: keycloak
      KC_DB_PASSWORD: your-db-password
      KC_HOSTNAME: auth.yourdomain.com
      KC_HTTP_ENABLED: "true"
      KC_PROXY_HEADERS: xforwarded
      KEYCLOAK_ADMIN: admin
      KEYCLOAK_ADMIN_PASSWORD: your-admin-password
    ports:
- "127.0.0.1:8080:8080"- Set
KC_HOSTNAMEexplicitly — production mode requires Keycloak to know its own public-facing domain. - Set
KC_PROXY_HEADERS: xforwarded— Caddy terminates HTTPS and talks to Keycloak internally over plain HTTP; this tells Keycloak to trust theX-Forwarded-*headers Caddy adds, so it correctly understands requests arrived over HTTPS. - Use plain
start, notstart --optimized. The--optimizedflag assumes a separatekc.sh buildstep has already pre-baked configuration into the image. Using it without that step causes a misleadingDriver does not support the provided URLdatabase error.

Keycloak doesn’t require LDAP.
Keycloak includes its own internal database for storing users, groups, roles, and credentials, making it a complete standalone Identity Provider. LDAP federation is optional and is primarily used to integrate with an existing enterprise directory.
In this lab, LDAP is used to demonstrate federation rather than because Keycloak depends on it. You could create the same users and groups directly in Keycloak, assign users to groups, and authenticate Grafana exactly the same way. Keycloak also supports synchronizing data between its internal database and LDAP—importing users and groups from LDAP into Keycloak, or writing changes made in Keycloak back to LDAP when LDAP edit mode is enabled.
Federate from LDAP across the network
First create a new relam, click on the dropdown on the top left corner and you will have the option to create a new one. Enter an id, optionally you can add a display name which will be displayed in sign in page. Switch to the new realm before continuing to user federation.
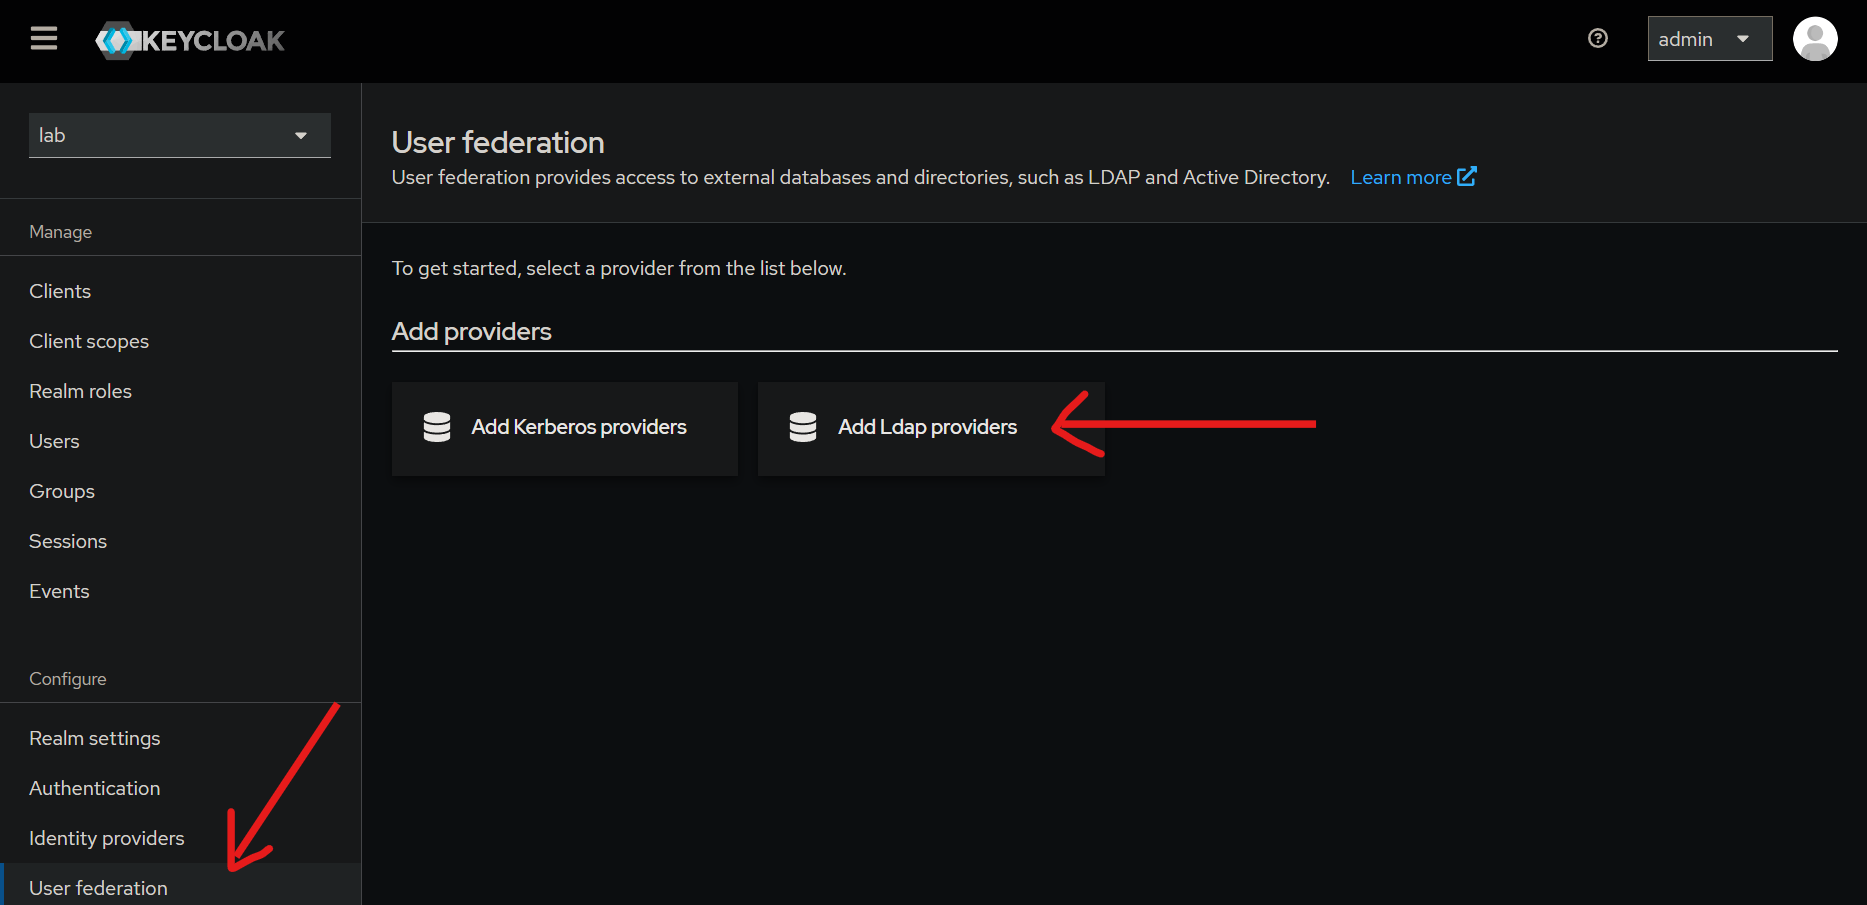
Point Keycloak’s LDAP federation at the directory server using the most direct private network path available. In this lab, both servers reside in the same AWS VPC, so Keycloak connects to the LDAP server’s private IP rather than its public address.
If private connectivity isn’t available, Keycloak can connect using a public IP or DNS name. In that case, the LDAP connection should be secured with LDAPS (port 636) or StartTLS instead of plain ldap://. This is the recommended production best practice whenever LDAP traffic traverses untrusted networks.
- Connection URL:
ldap://<LDAP-server-private-IP>:389 - Vendor: Other
- UUID LDAP attribute:
entryUUID - User object classes:
inetOrgPerson, posixAccount
Before this will connect, open the path between the two servers:
# On the LDAP server — confirm slapd listens on all interfaces, not just localhost
sudo ss -tlnp | grep slapd
# Expect: 0.0.0.0:389

# On the Keycloak server — confirm the network path is actually open
nc -zv <LDAP-server-private-IP> 389Also add an inbound security group rule on the LDAP server allowing port 389 from the Keycloak server specifically (reference its security group as the source, not a static IP).
You can also verify the connection and authentication here.
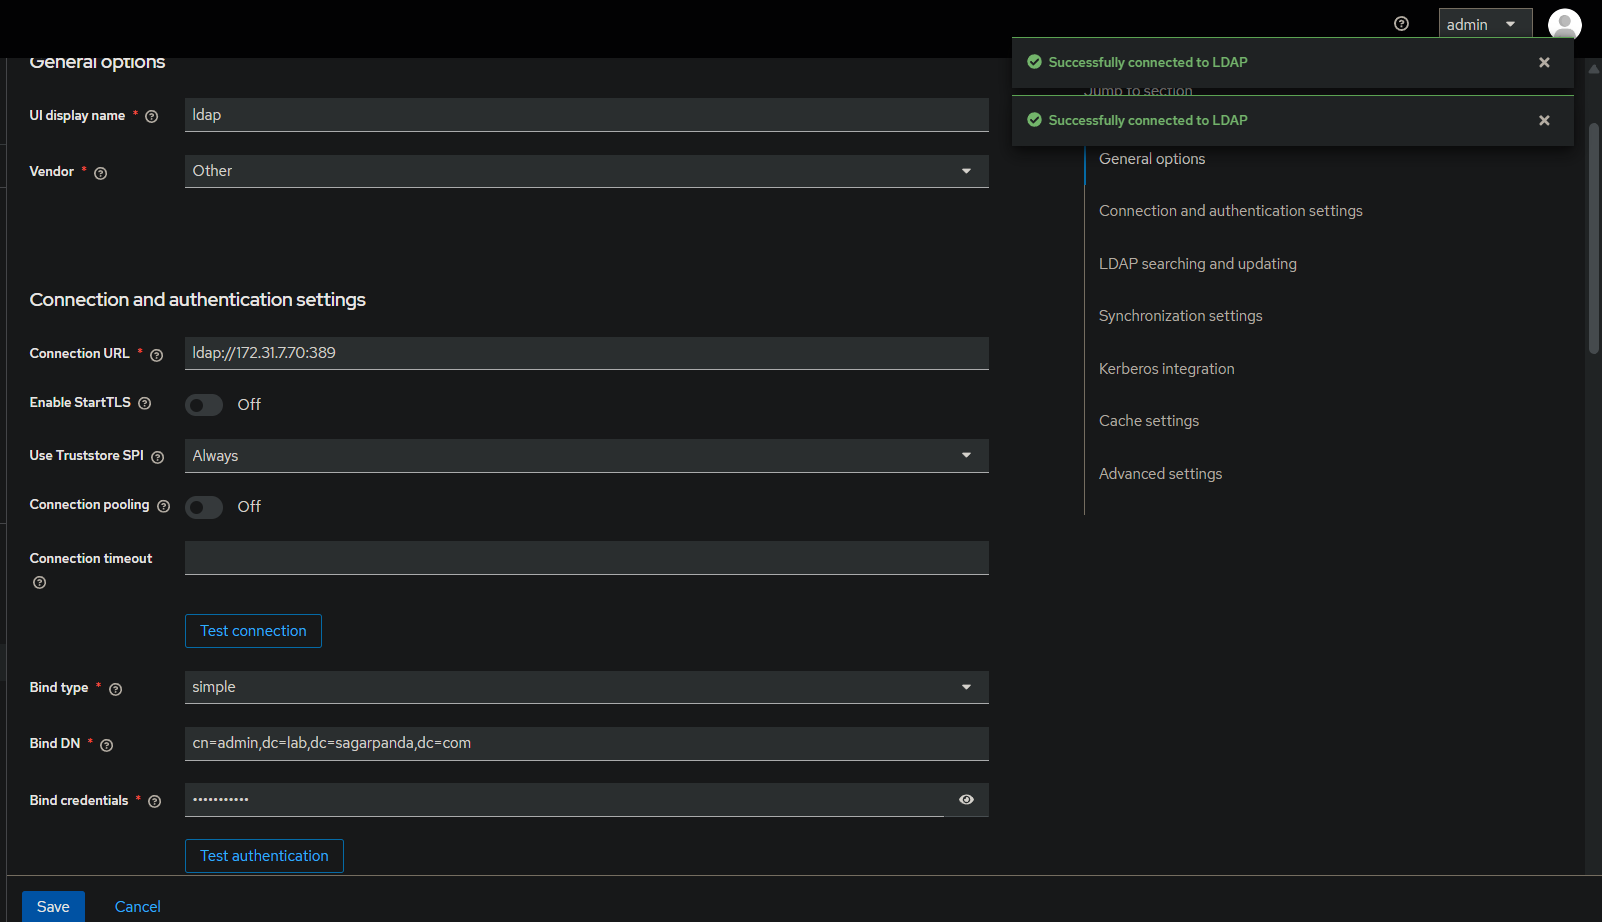
Map LDAP groups into a token claim
- User federation → LDAP provider → Mappers → Add mapper, type
group-ldap-mapper - Group Object Classes:
posixGroup - Membership LDAP Attribute:
memberUid - Membership Attribute Type:
UID - Preserve Group Inheritance: Off — required when using UID-type membership, since Keycloak can’t reconstruct hierarchy from flat usernames
After syncing, confirm grafana-admins appears under Keycloak’s Groups, showing jdoe as a member.
Group data doesn’t reach an application automatically — add it explicitly as a token claim:
- Client scopes → Create client scope named
groups→ Mappers → Add mapper → Group Membership → Token Claim Name:groups, add to both ID and access tokens - Assign this scope to the
grafanaclient under its own Client scopes tab
Skipping this step causes no error — the groups claim simply won’t exist in the token, and any downstream role-mapping logic has nothing to check against.
Register Grafana as an OpenID Connect client
Before Grafana can authenticate users through Keycloak, it must first be registered as an OpenID Connect client.
Navigate to Clients → Create client and configure the following:
- Client type: OpenID Connect
- Client ID: grafana
- Client authentication: On
- Authorization: Off
- Standard flow: Enabled
- Root URL: https://grafana.yourdomain.com
- Valid redirect URI: https://grafana.yourdomain.com/login/generic_oauth
The redirect URI must exactly match Grafana’s Generic OAuth callback endpoint or the authentication request will be rejected.
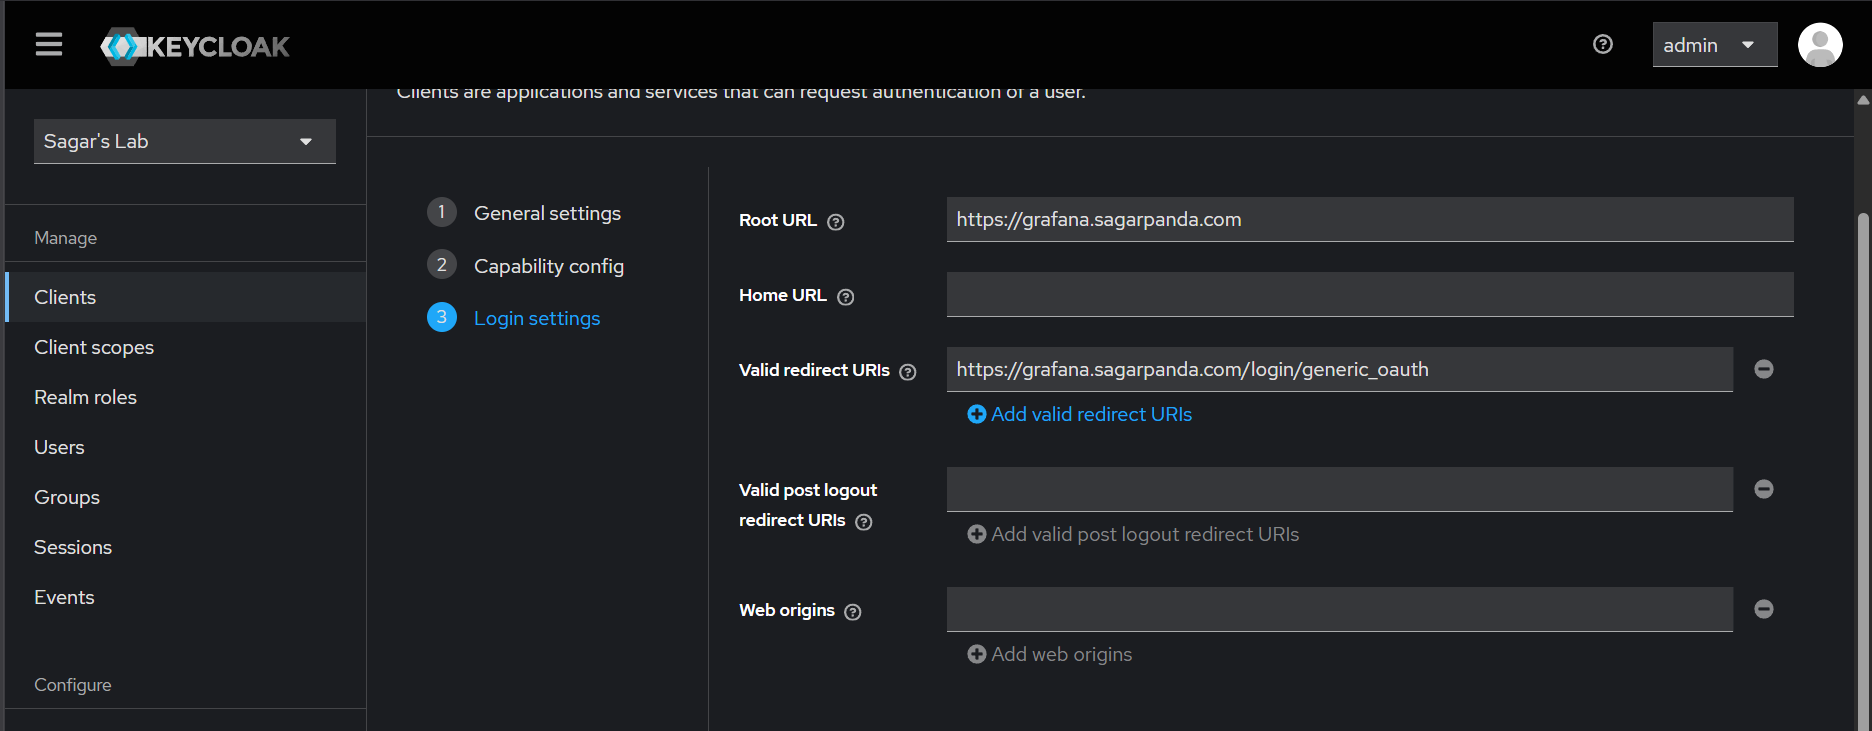
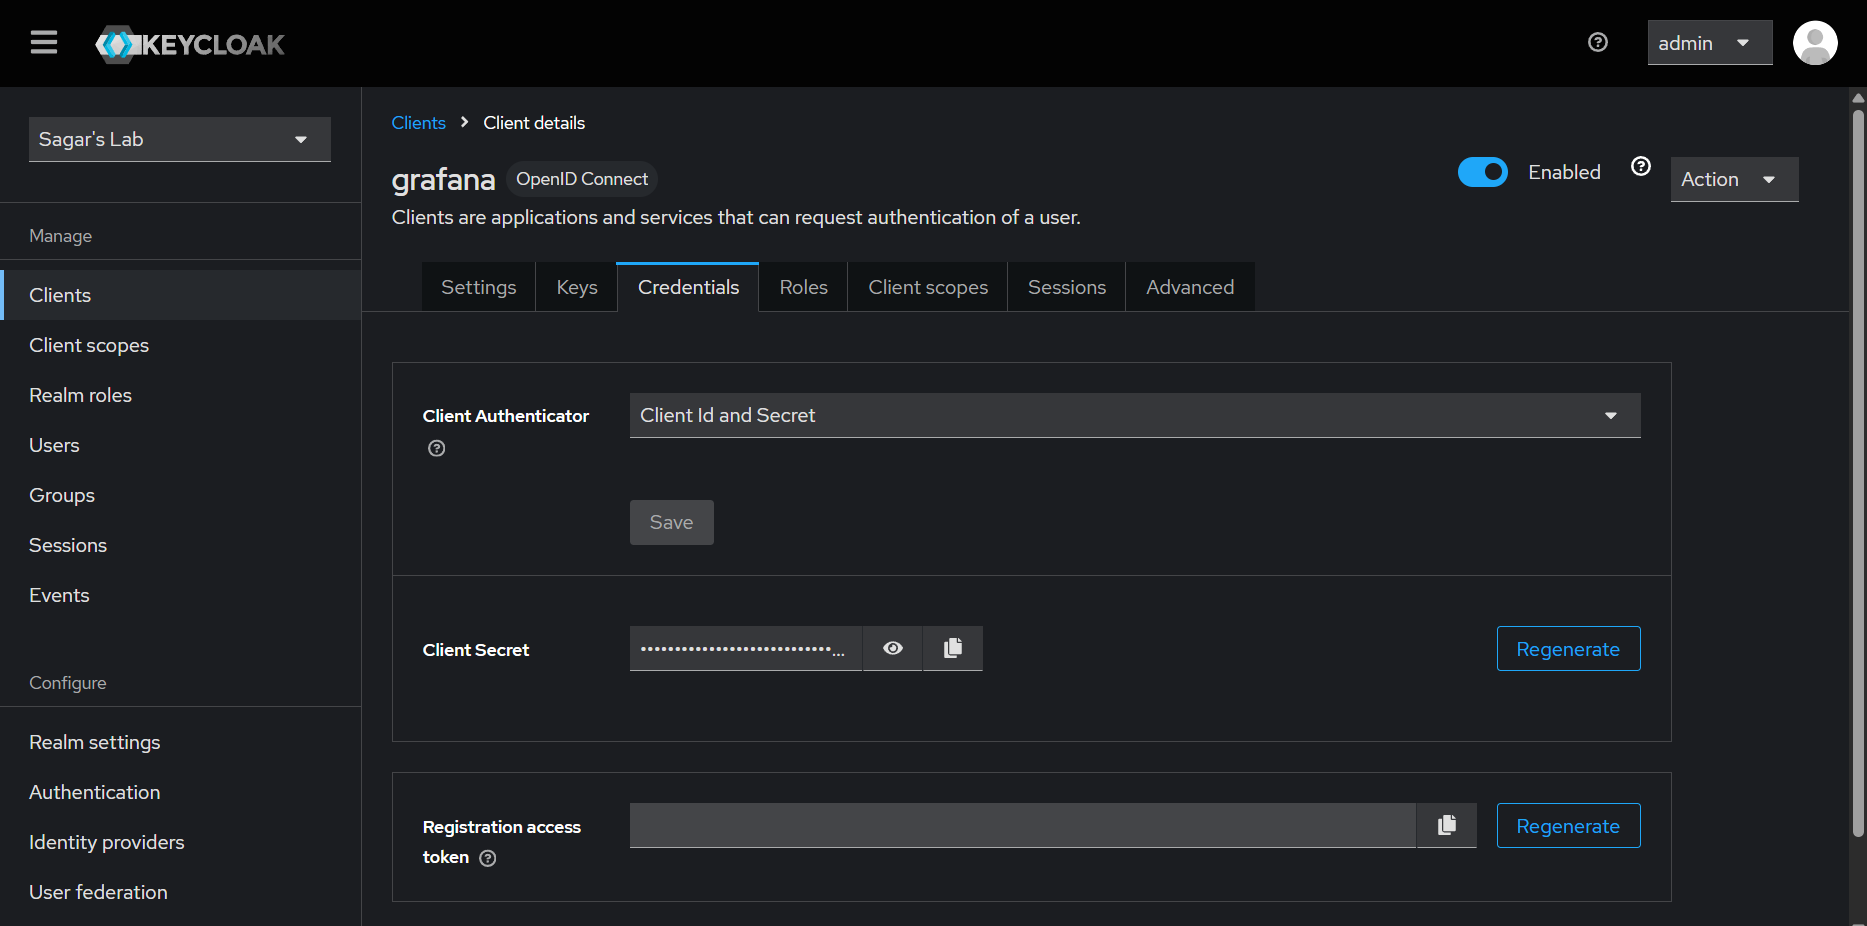
Once the client has been created, open the Credentials tab and copy the generated Client Secret. Grafana uses this together with the Client ID to authenticate itself when exchanging the authorization code for tokens.
Part 3: Grafana — OIDC via Keycloak, Configured Through the UI
Recent Grafana versions include a full SSO Settings UI (Administration → Authentication → Generic OAuth) — configure and update an OAuth provider live, with no config files and no container restarts required.
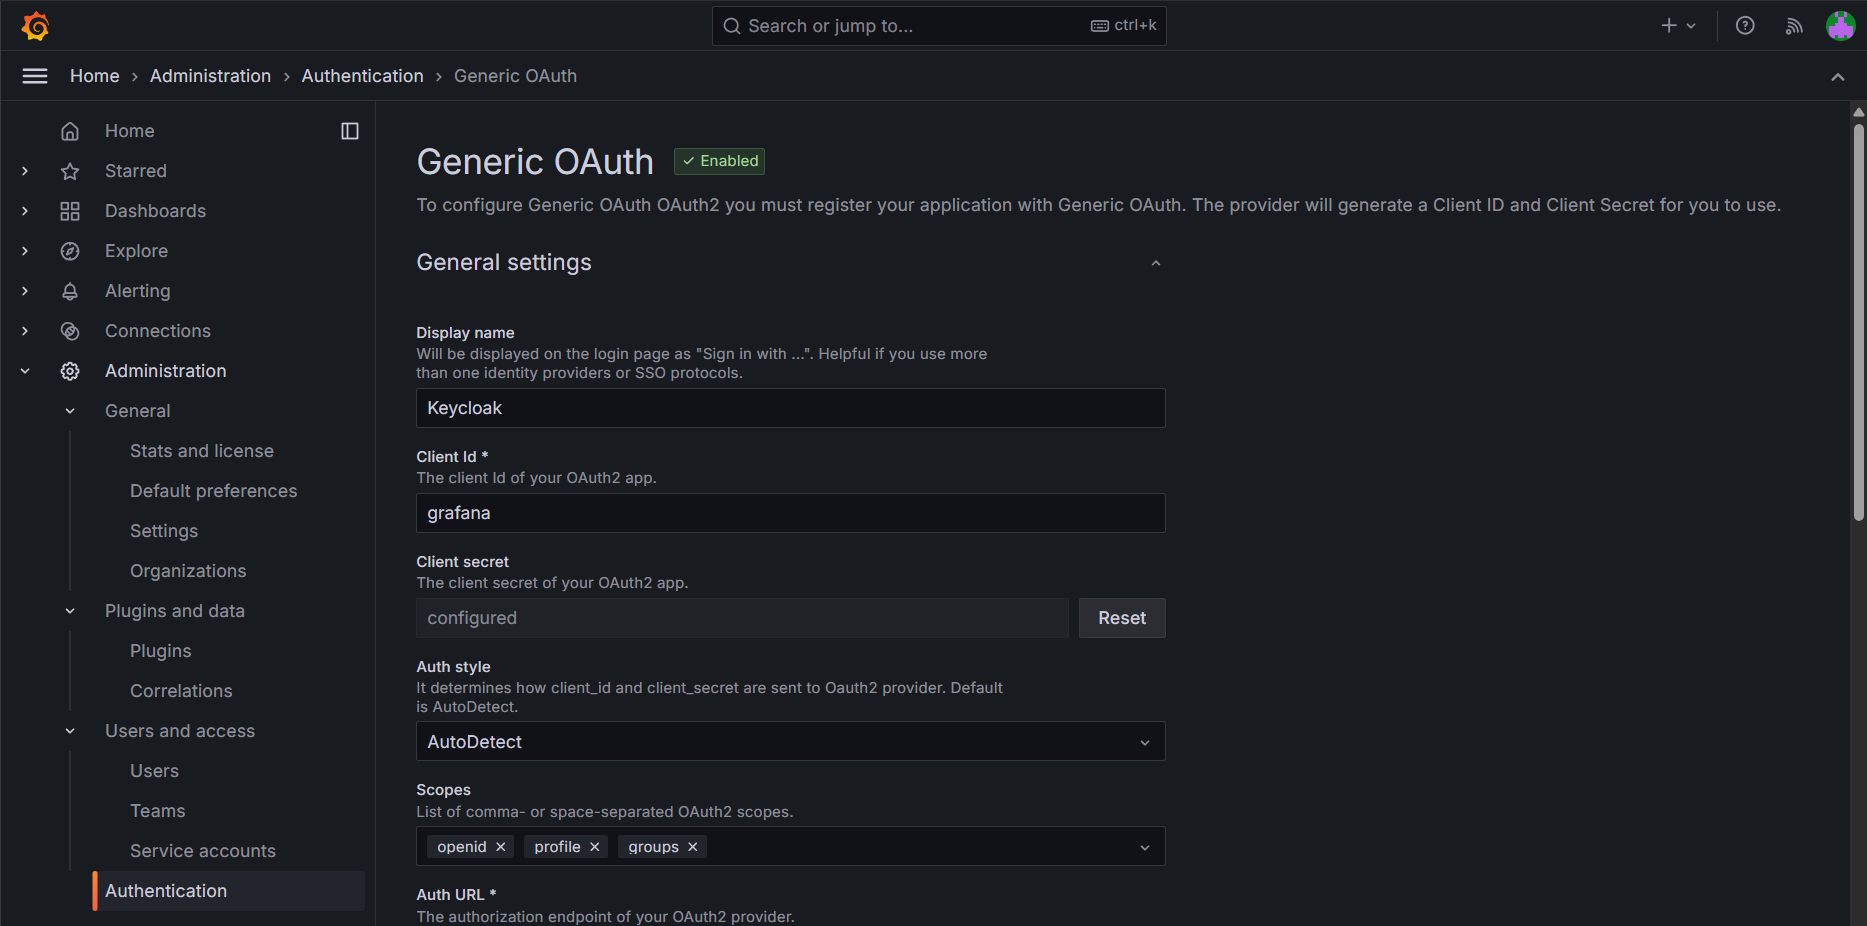
- Client ID & Client Secret: Use the Client ID (grafana) and the corresponding Client Secret from the client registered earlier in Keycloak.
- Scopes:
openid profile email groups— the last scope only works if the client scope from Part 2 has been correctly created and assigned. Requesting a scope that doesn’t exist on the client can cause the entire authorization request to be rejected, not just the unrecognized piece — remove any provider-specific defaults (like GitHub’suser:email) that don’t apply to a generic OIDC provider. - Role attribute path:
contains(groups[*], 'grafana-admins') && 'GrafanaAdmin' || 'Viewer'— a JMESPath expression evaluated against the token’s claims to decide what role to assign. - Allow assign Grafana Admin — enable this explicitly, or Grafana silently ignores a
GrafanaAdminrole value even when the path expression correctly returns it.
Keep the distinction between Grafana’s two privilege tiers clear:
- Org Admin/Editor/Viewer — dashboard and data-source permissions within an organization.
- Grafana Server Admin (
GrafanaAdmin) — a higher, instance-wide tier controlling things like the Authentication settings screen itself. This requires the distinct'GrafanaAdmin'value in the role path, combined with the toggle above —'Admin'alone only grants the lower org-level tier.
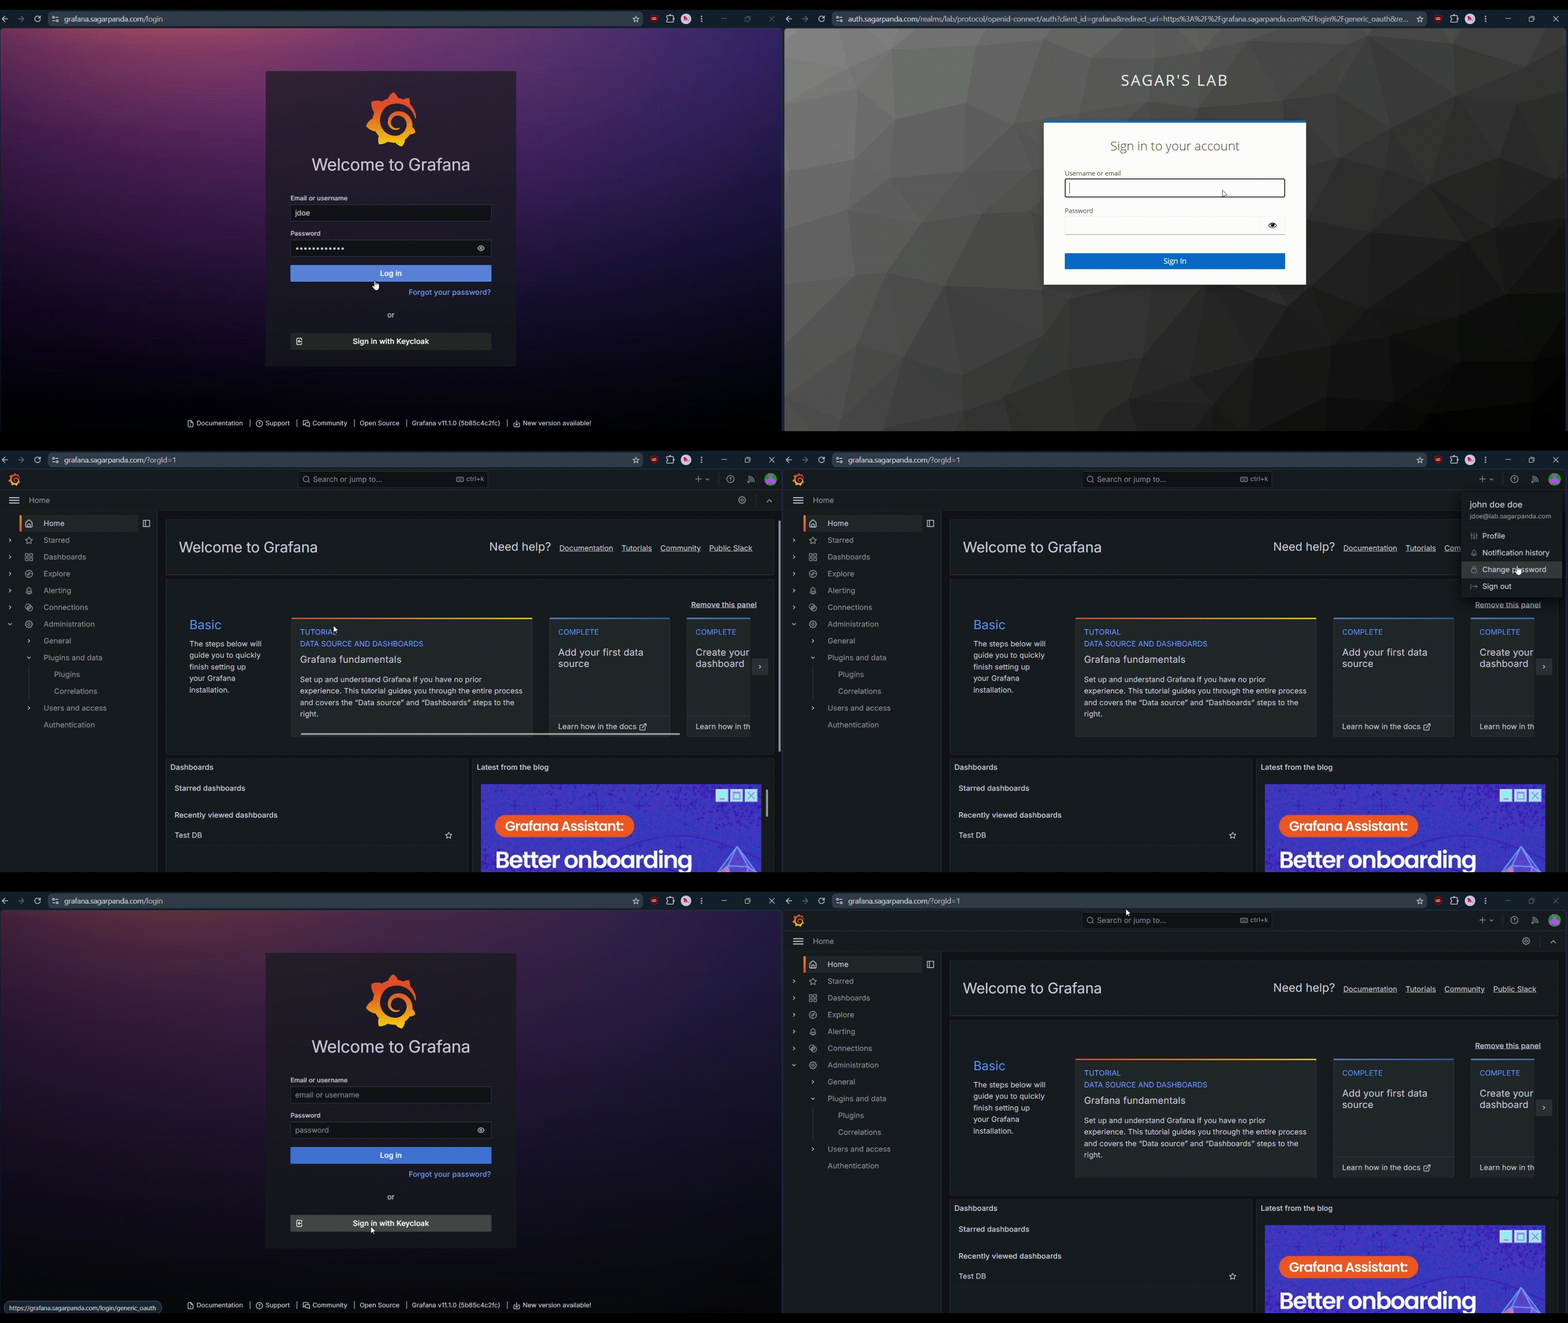
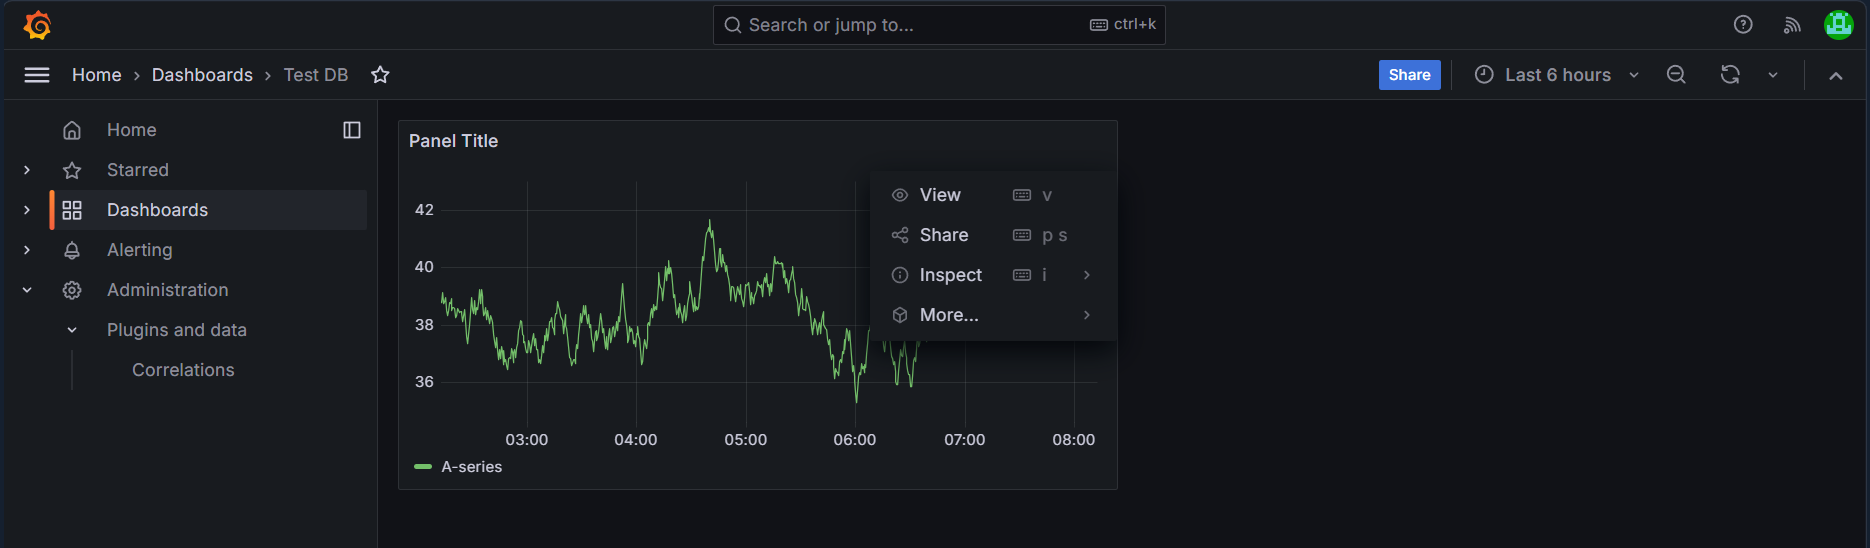
With this correctly configured: log in as jdoe (member of grafana-admins) and land with full server-admin rights — creating data sources, editing dashboards, managing authentication settings. Log in as asmith (no special group) via the same SSO button and land on a read-only dashboard with no edit controls — real, working, group-driven authorization verified end to end.
Part 4: Adding Okta Alongside Keycloak
Until now we’ve used a self-hosted Identity Provider. Next, we’ll integrate Okta, a managed cloud Identity Provider, with the same Grafana instance to demonstrate that applications can trust multiple independent OpenID Connect providers simultaneously.
Create an Okta Developer Account
If you don’t already have an Okta tenant, sign up for the Okta Integrator Free Plan.
After completing registration, you’ll receive an organization URL similar to:
https://integrator-12345678.okta.comRegister a second, independent Identity Provider on the same Grafana instance. Grafana treats Okta as its own dedicated authentication provider, separate from the Generic OAuth provider used for Keycloak. Both can be enabled simultaneously, each appearing as its own “Sign in with…” button on the Grafana login page.
Create Users and Groups
Create one user for example:
- Jane Doe (
jane.doe@example.com)
Next, create a group named grafana-admins and assign Jane Doe to it.
Note: Your Okta administrator account can also sign in to applications assigned to it. This guide uses a separate test user (Jane Doe) to clearly distinguish administration of Okta from end-user authentication, but you can use your administrator account instead if it has been assigned to the application.
Okta doesn’t require LDAP either.
Okta’s Universal Directory can store users and groups directly, but organizations with an existing LDAP directory can synchronize identities using the Okta LDAP Agent. This lab uses Universal Directory to keep the cloud identity provider independent from the LDAP-backed Keycloak deployment.
Register Grafana in Okta
Create a new OIDC application for Grafana:
Applications → Create App Integration → OIDC – OpenID Connect → Web Application
Configure:
- Sign-in redirect URI:
https://grafana.sagarpanda.com/login/okta
Unlike Generic OAuth, Grafana’s built-in Okta provider uses the dedicated /login/okta callback path. The redirect URI configured in Okta must match this value exactly, otherwise the OIDC login flow will fail.
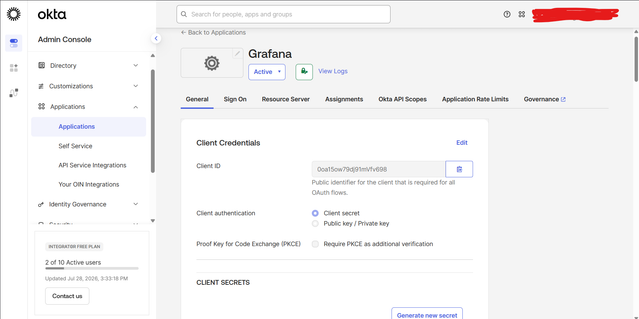
Assign the application to the users or groups that should be allowed to authenticate, then save the application and copy the Client ID and Client Secret.
Add a Groups Claim
Okta doesn’t include group membership in OIDC tokens by default, so a custom claim must be added.
Navigate to:
Security → API → Default Authorization Server → Claims → Add Claim
Configure the claim as follows:
- Name:
groups - Include in: ID Token and Access Token
- Value type: Groups
- Filter: Matches regex
.*
This adds the authenticated user’s group memberships to the token so Grafana can make authorization decisions based on them.
Configure Grafana’s Okta Provider
Open:
Administration → Authentication → Okta
Configure the provider with:
- Client ID and Client Secret from the Okta application
- Okta Org URL: your
https://integrator-xxxxx.okta.comtenant - Scopes:
openid profile email groups - Role Attribute Path:
contains(groups[*], 'grafana-admins') && 'GrafanaAdmin' || 'Viewer'Enable the provider and save the configuration.
Test the Integration
Sign out of Grafana and return to the login page. You should now see two independent authentication options.
Sign in as Jane Doe and verify that Grafana grants full server administrator privileges through membership in the grafana-admins group.
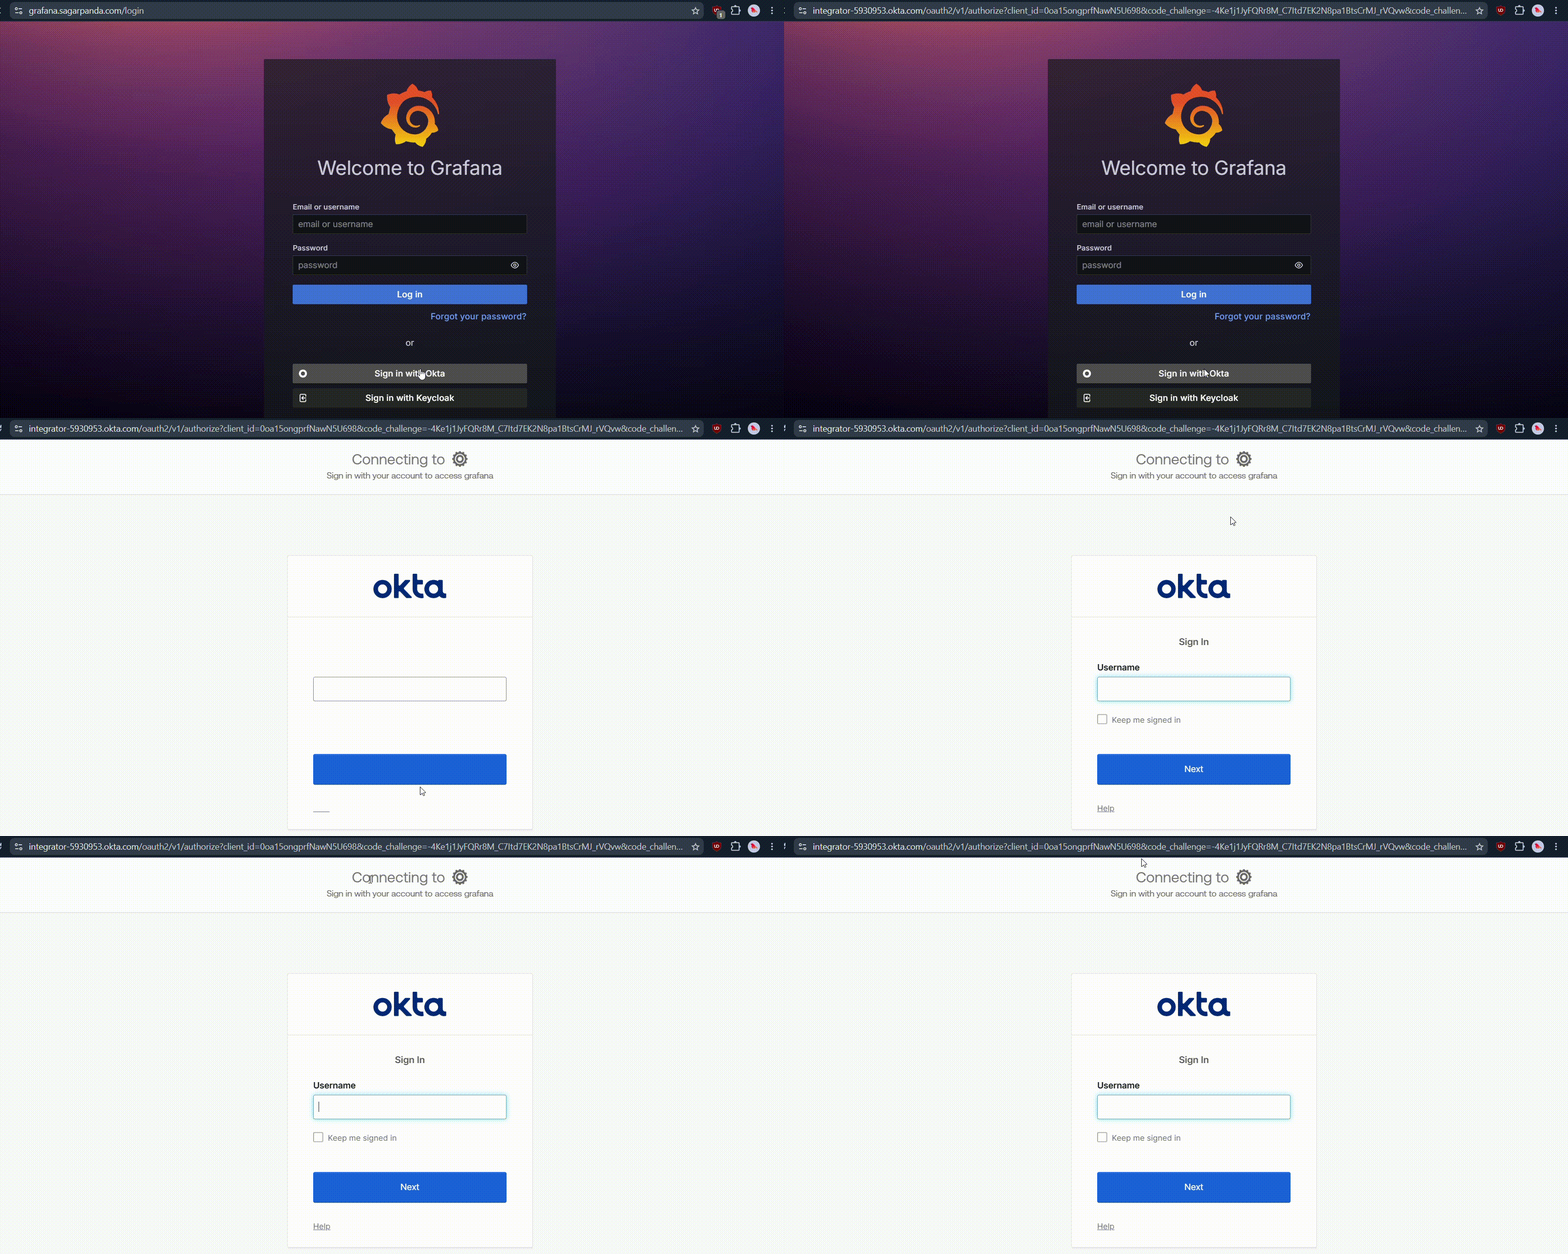
At this point, the same Grafana instance trusts two completely independent OpenID Connect identity providers—one self-hosted (Keycloak backed by LDAP) and one cloud-hosted (Okta). Both authenticate users using the same OIDC standard while independently issuing tokens that Grafana uses to authenticate users and determine their permissions.
Wrap Up
In this project we built a complete identity stack from the ground up—starting with an LDAP directory, federating it into Keycloak, integrating a cloud identity provider with Okta, and finally securing a real application using OpenID Connect and group-based authorization.
Along the way we also explored an important architectural point: LDAP is optional. Both Keycloak and Okta can manage their own users and groups, or integrate with an existing LDAP directory when organizations already have one. The application itself remains unaware of where identities originate—it simply trusts signed tokens issued by the configured Identity Provider.
Although the technologies used here are specific, the architecture is common across modern enterprise environments. Once you understand how directories, Identity Providers, federation, and token-based authentication work together, the same concepts apply whether you’re working with Active Directory, Microsoft Entra ID, Authentik, Ping Identity, or any other standards-compliant identity platform.