Build Your Own AWS VPC — Simple Terraform Deployment Steps!
Introduction
The VPC is a logical private network that allows us to control how our resources, like servers, are connected and protected.
With the help of VPC, we decide the range of IP addresses for the network, how we can divide the network into smaller parts, data flow into & out and rules for securing our resource.
First lets understand the components by setting it manually.
What is CIDR
CIDR is a method used to organize and allocate IP addresses more efficiently. Instead of assigning individual IP addresses one by one, CIDR allows us to group a set of addresses together. This makes network management and routing easier, especially when dealing with large numbers of devices.
There are many handy tools to calculate cidr range.
https://www.ipaddressguide.com/cidr
Breaking Down CIDR Notation
An IP address typically looks like this: 192.168.1.0. With CIDR, we’ll often see something like 192.168.1.0/24. Here’s what that means:
- The IP part (
192.168.1.0): This is the base address, also known as the “network address.” It represents the starting point of a range of IP addresses. - The
**/24**part: This is the CIDR suffix and tells us how many bits (out of 32 total bits in an IPv4 address) are used to identify the network part of the address. In this case,/24means that the first 24 bits define the network, leaving the remaining 8 bits to define individual devices (or hosts) within that network.
Internet Gateway
An Internet Gateway (IGW) is a managed aws service in a VPC that allows internet connection to our cloud resources.
Subnets
A subnet (sub-network) is a smaller network within one large network, usually within a Virtual Private Cloud (VPC). It helps to divide an IP network into logical segments to manage traffic more effectively and improve security.
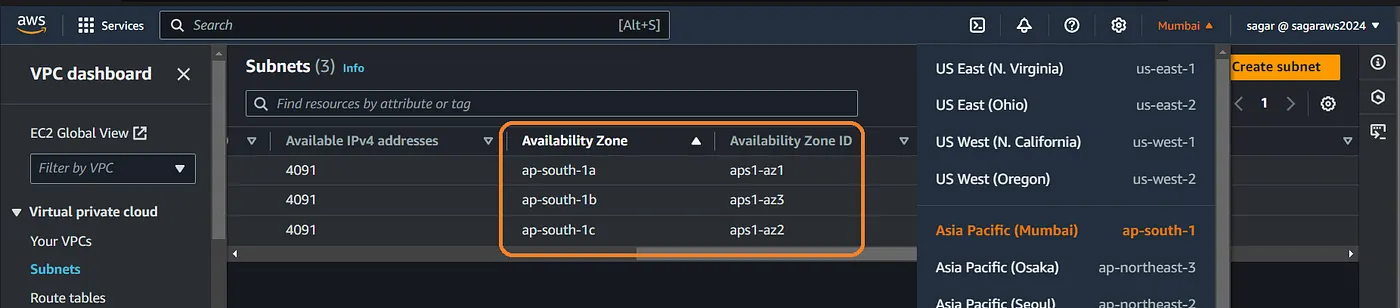
In case of AWS subnets are attached to specific availability zone. An example would be Mumbai region is ap-south-1 and it has 3 subnets in 3 diff availability zones (in a single city) as ap-south-1a, 1b and 1c. We can already see this from the default vpc.
Types of Subnets
- Public Subnet:
- A public subnet is a network segment that is accessible from the internet. It has an Internet Gateway attached, which allows traffic to flow in and out from the internet.
- You typically place resources that need public access (like web servers) in a public subnet.
- Private Subnet:
- A private subnet is a segment that does not have direct internet access. Resources in a private subnet are protected from the public internet.
- Private subnets are generally used for sensitive resources (like databases or internal services) that should not be exposed to the internet.
- Instances in a private subnet can access the internet indirectly via a NAT Gateway for outbound traffic (like software updates).
By default all subnets are private, unless we attach an IGW and update the routes. We’ll see this in action when creating a VPC and subnets.

Route Tables (RT)
A Route Table in a VPC is a set of rules that determine where network traffic from your subnet or gateway is directed. It plays a critical role in controlling the flow of traffic in and out of your VPC, ensuring that data reaches its intended destination.
Key Concepts of Route Tables:
- Routing Rules:
- Each route table contains a list of routes that define how traffic is directed. Each route has a destination CIDR block (which specifies the range of IP addresses) and a target (which can be an Internet Gateway, NAT Gateway, or another resource).
- For example, a route might specify that any traffic destined for
0.0.0.0/0(which means all IP addresses) should go to the Internet Gateway (IGW).
2. Subnet Association:
- Each subnet in a VPC must be associated with a route table. If no explicit route table is associated, the subnet uses the VPC’s main route table by default.
- You can have multiple route tables in a VPC, allowing for different routing rules for different subnets.
3. Public vs. Private Route Tables:
- Public Route Table: Contains routes directing traffic to the IGW. Subnets associated with this route table are considered public because they can send and receive traffic from the internet.
- Private Route Table: Typically does not contain a route to the IGW. Instead, it may route traffic through a NAT Gateway for instances in private subnets to access the internet without exposing them directly.
Components of a Route Table:
- Destination: The destination CIDR block (e.g.,
10.0.0.0/16,0.0.0.0/0). - Target: The target for the traffic defined by the route (e.g., IGW, NAT Gateway, VPC Peering Connection, or another subnet).
- Local Route: Automatically created for your VPC, allowing communication between instances in the same VPC.
Example:
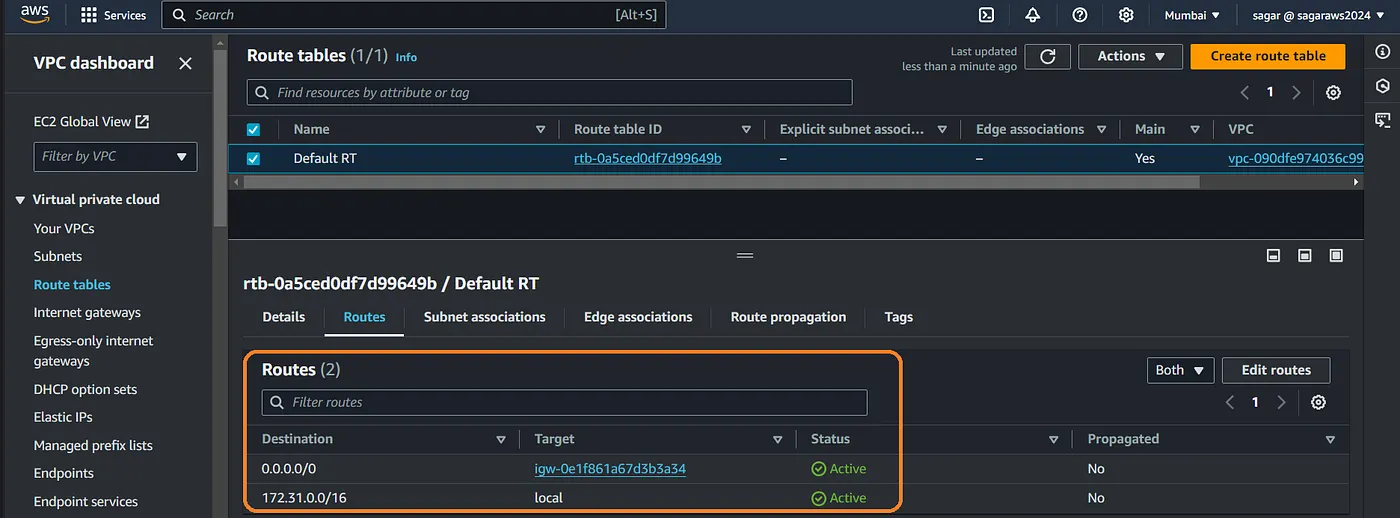
in this example:
- The first route (0.0.0.0/0): Sends all internet-bound traffic to the Internet Gateway (IGW). This allows instances in the associated subnets to access the internet.
- The second route (172.31.0.0/16): Enables local communication within the VPC. This route allows instances to communicate with each other using their private IP addresses.
Alright then, lets start creating them.
Setup VPC:
From the console go to vpc, click on create vpc and then select VPC only so we have granular control over what we are creating. Enter a name, choose cidr range (/24 for 256 ips, /16 for 65,536 ips etc) and create it.
You may also use the cli cmds if you wish to.
aws ec2 create-vpc --cidr-block 10.0.0.0/16 --region ap-south-1 --tag-specifications 'ResourceType=vpc,Tags=[{Key=Name,Value=WbApp_VPC}]'

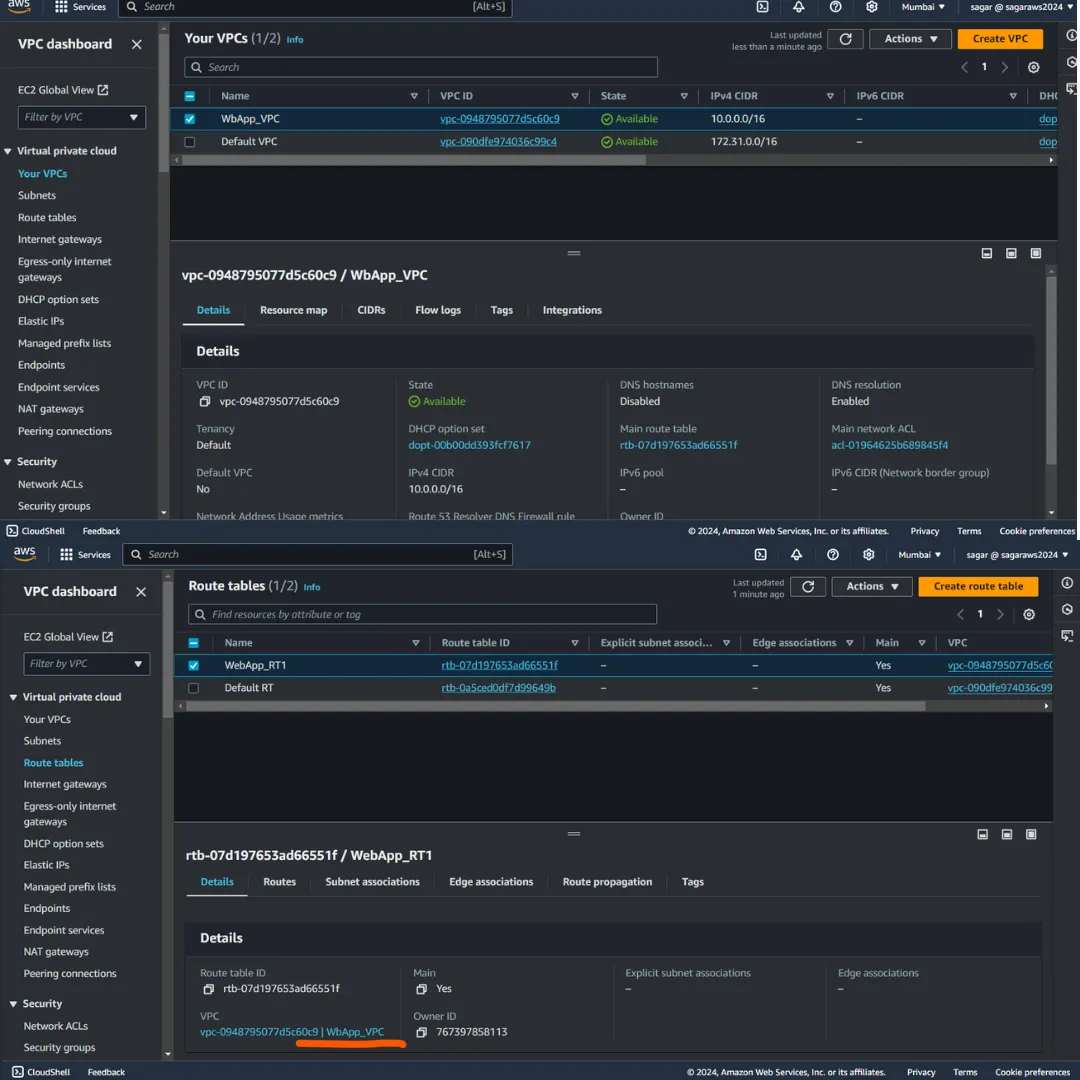
The vpc has been created and a route table has also has been created.
Edit the route table name for easy identification. As we see the route table is attached to the vpc we created. (WebApp_VPC).
We can now proceed to create subnets. From the left menu click on subnets, click on create subnet. Choose the recent vpc id from the drop down.
Now we choose the name, subnet CIDR and optionally AZ. Note it shows how many IPs will be available in one subnet (256 for the example below).
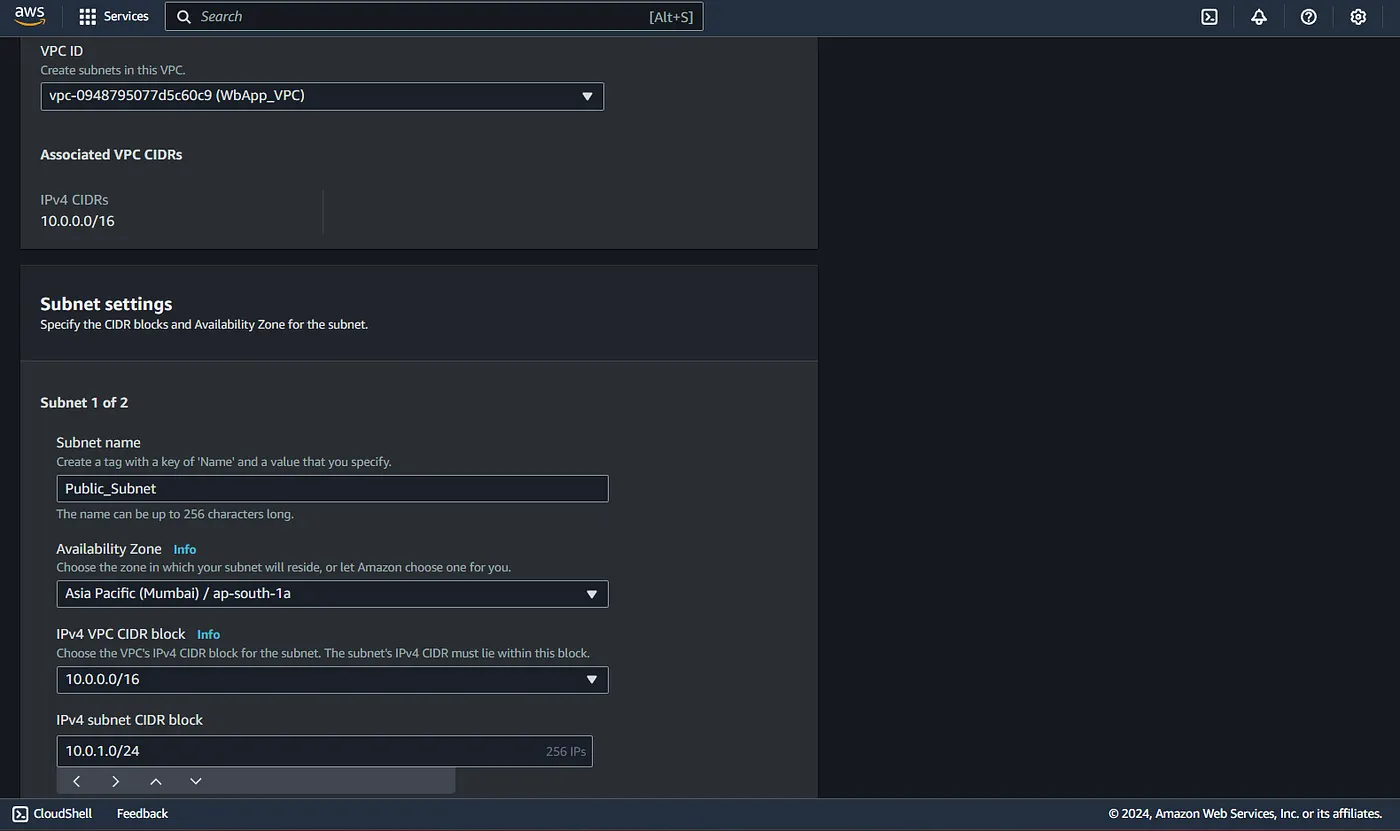
Similarly you can create more subnets by clicking on add new subnets on the bottom of the page.
Be careful to choose diff cidr range, if they overlap, it wont be created.
Now we have 2 subnets. lets create an instance in the public subnet.
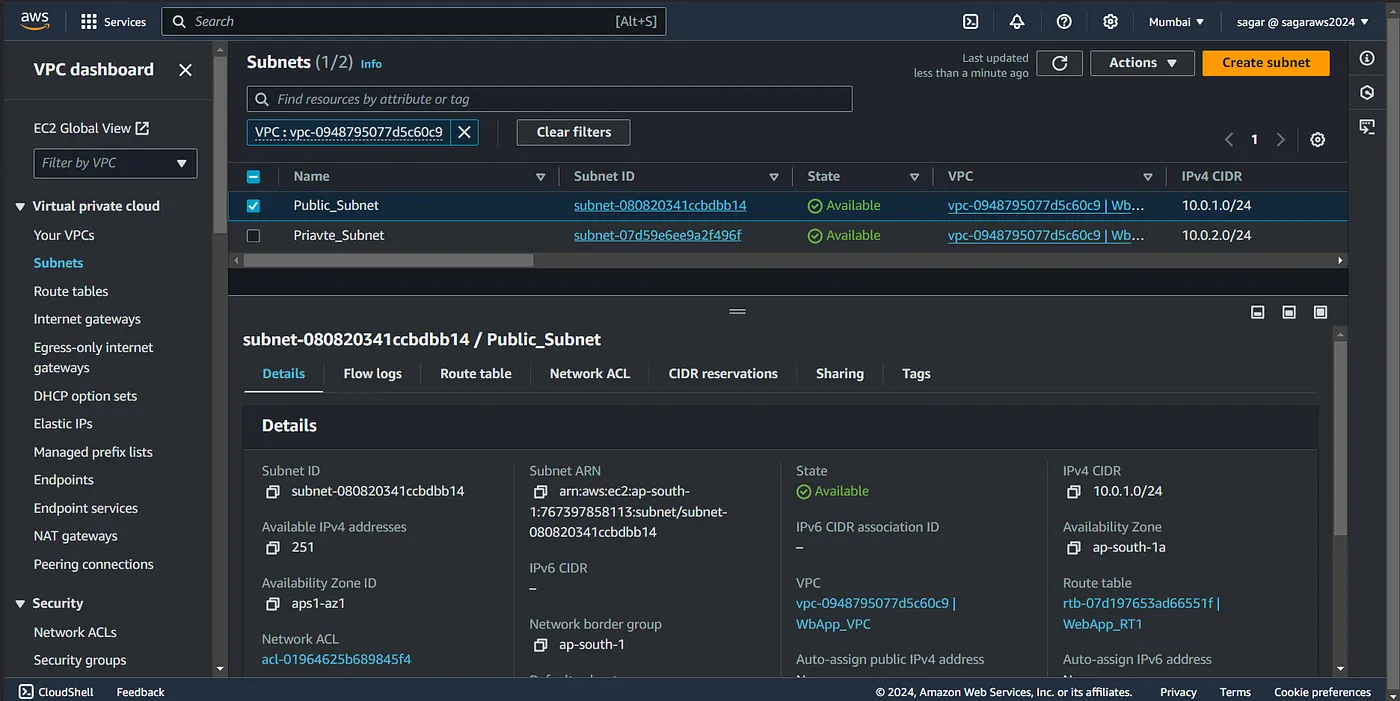
Note: The number of available ips now is 251 contrast to 256 while creation. This is because AWS reserves 5 IP addresses in each subnet for internal networking and management purposes.
Network Address: The first IP address (.0) is reserved for the network identifier.
VPC Router: The second IP address (.1) is used for the default gateway (VPC router).
Reserved by AWS: The third IP address (.2) is reserved for future AWS use.
DNS Server: The fourth IP address (.3) is used for Amazon’s DNS service.
Broadcast Address: The last IP address in the range is reserved for the broadcast address (even though AWS doesn’t support broadcast).
These reserved addresses ensure smooth network operation within the AWS infrastructure.
Further operations with IGW and RT:
From the EC2 creation page, edit the network settings, choose your vpc, and then select the public subnet. Assign public ip.
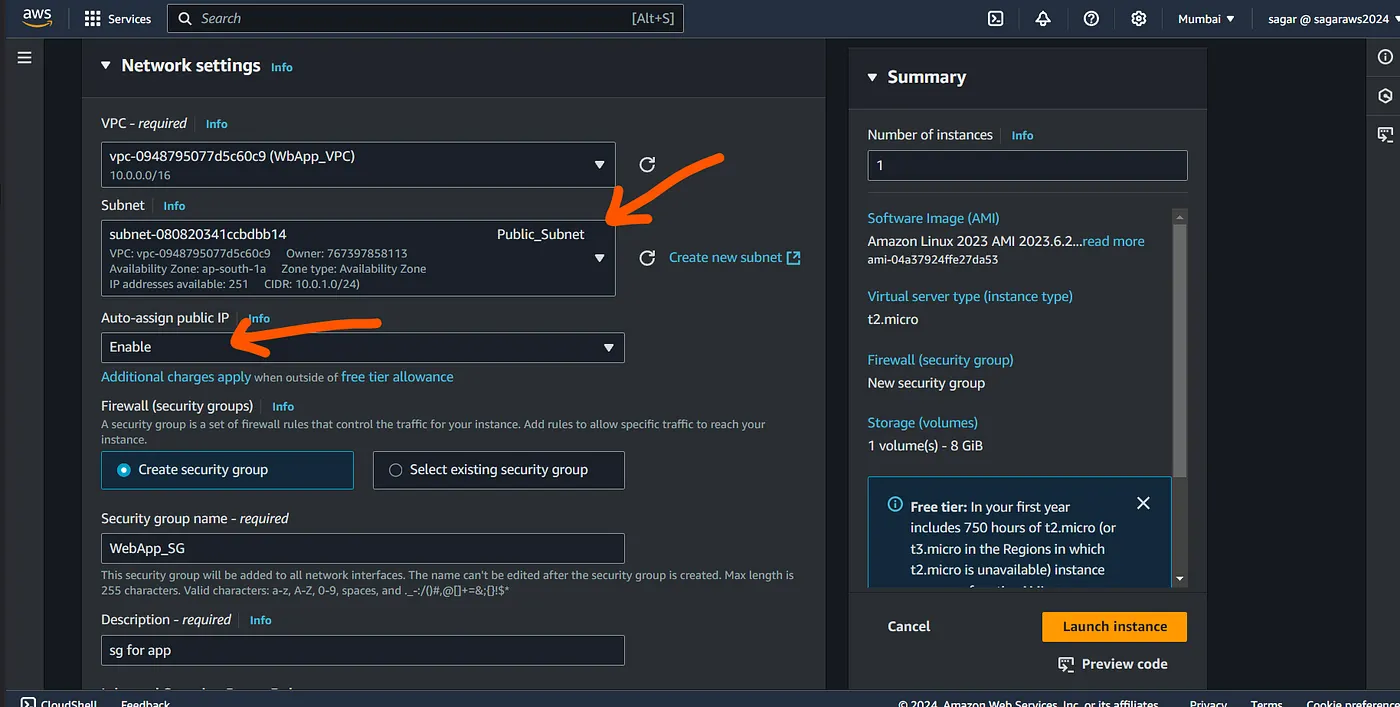
Create a security group, and have SSH allowed, and launch the instance.

Alright we have our instance running, so lets ssh into it. Since I did not create a key pair, I’ll use instance connect.
And here we alredy see a message saying instance is not in public subnet. Now even if you try connecting, it will fail.
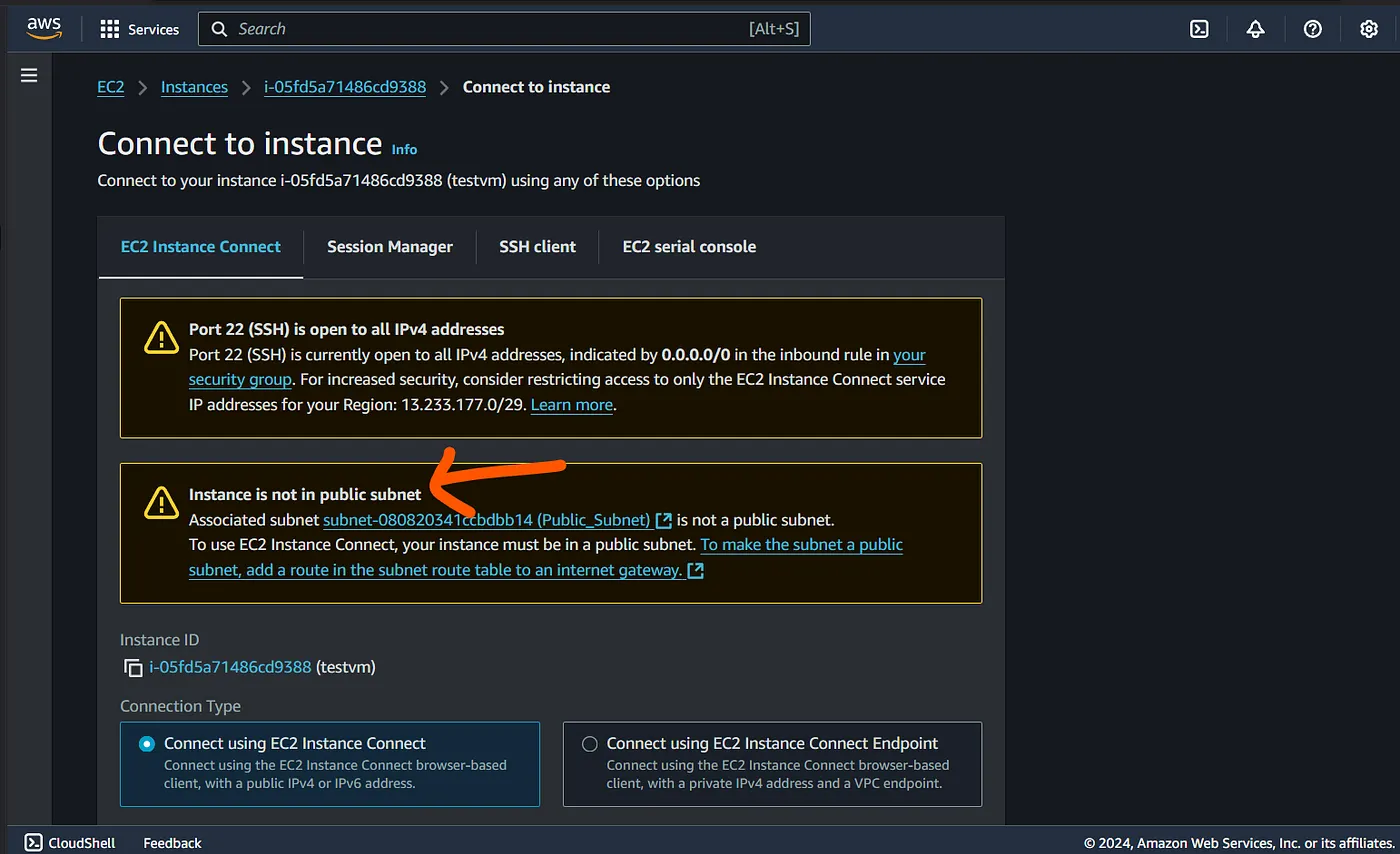

So what’s wrong, we launched the instance in public subnet right? Nah, we just named the subnet as public but its indeed a private subnet.
Alright, so Internet gateway can provide internet to our subnet. Lets create it.
VPC — Internet gateway — Create Igw.
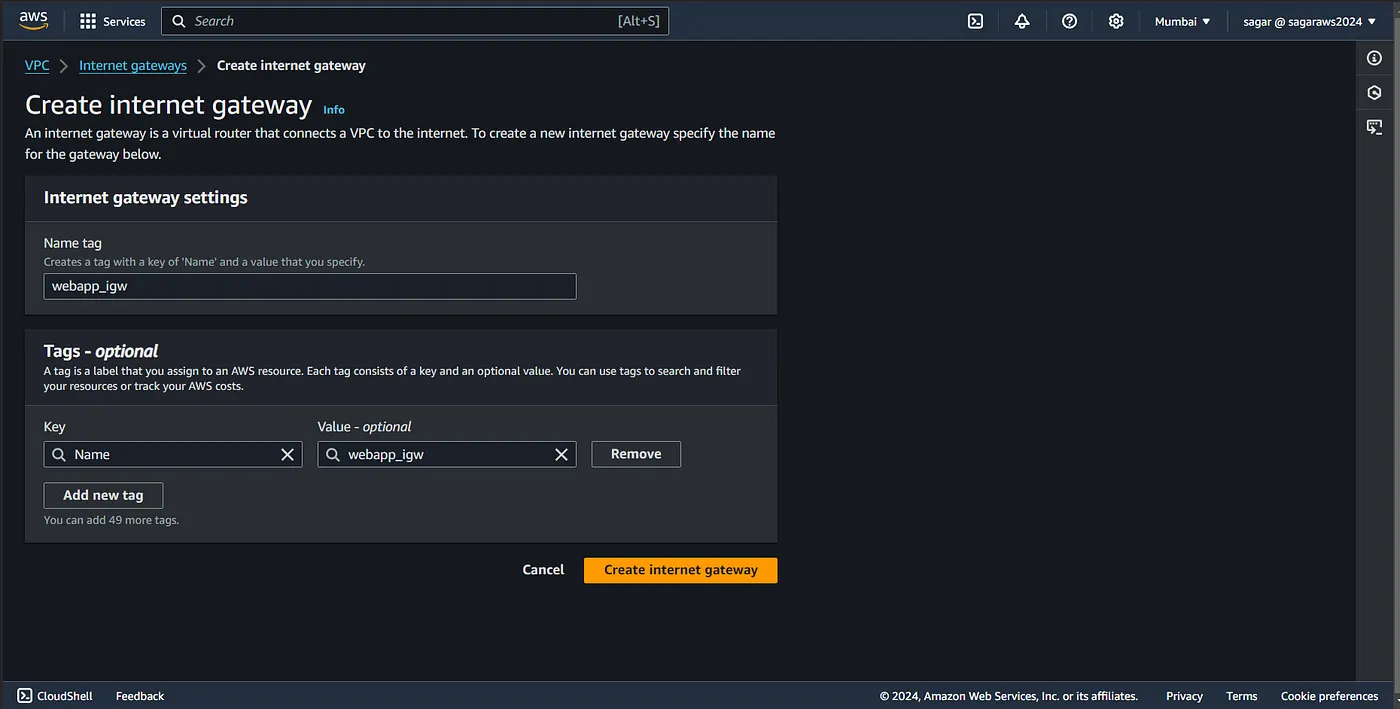
While creating the igw, we did not specify how it going to connect to our resources, so we need to attach it to our vpc.
Select the igw — — action — attach to VPC, select your vpc.
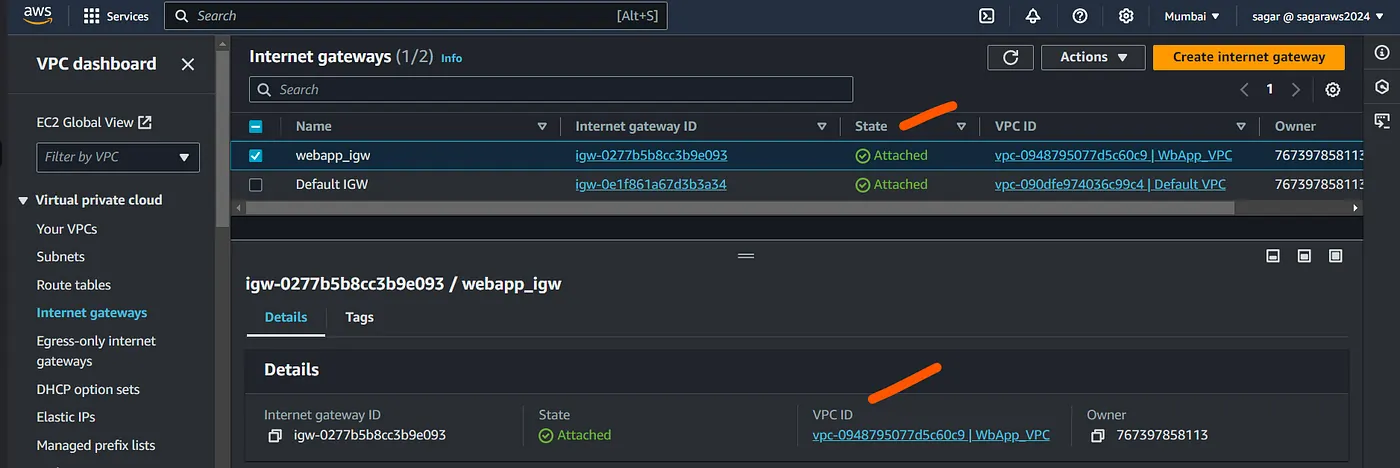
Alright, now that igw has been attached, we should b able to ssh?
Eh, still nope. The remember route tables from the above? This still does not have a route to decide what to do if the request comes from a diff ip range (out of the cidr, our ip from public internet).

We can modify the route to add another that points to the igw, but it would make the other subnet also publically accessible as this route table created automaticllay with vpc and has been associted to all subnets (2 in cour case).
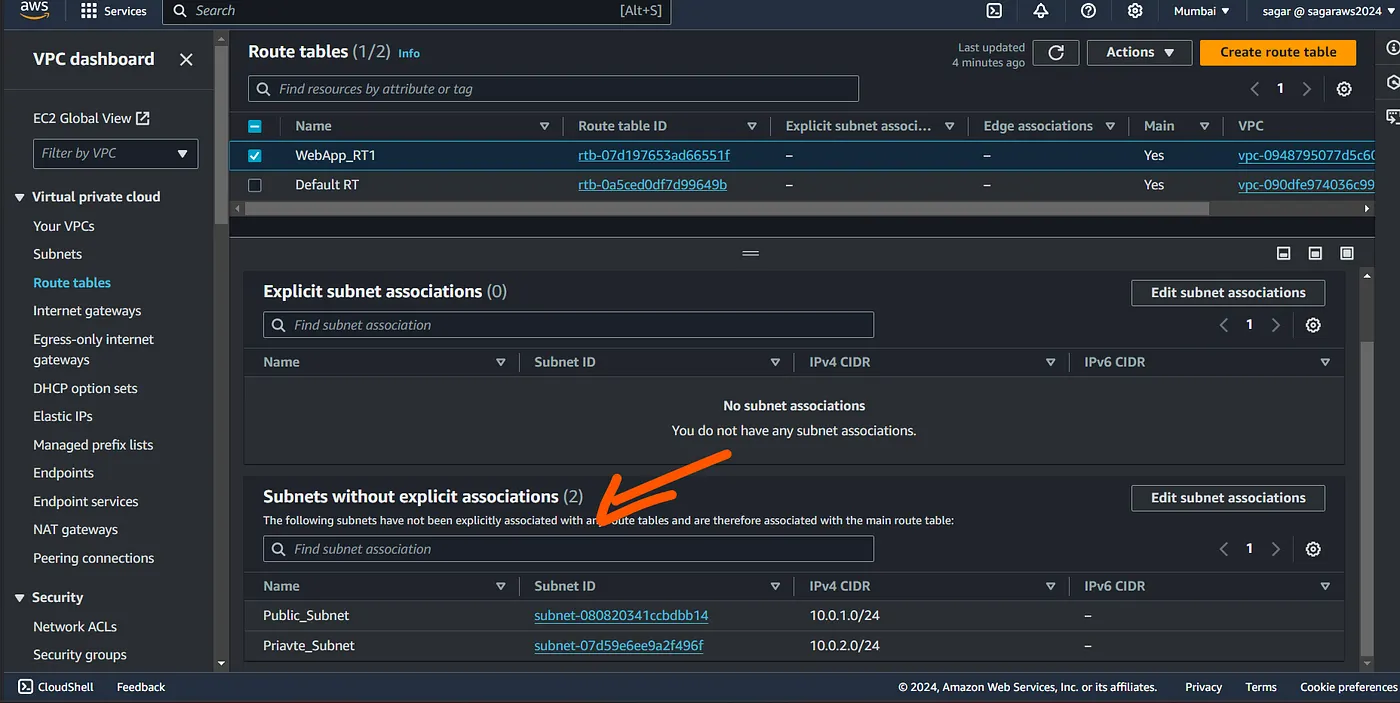
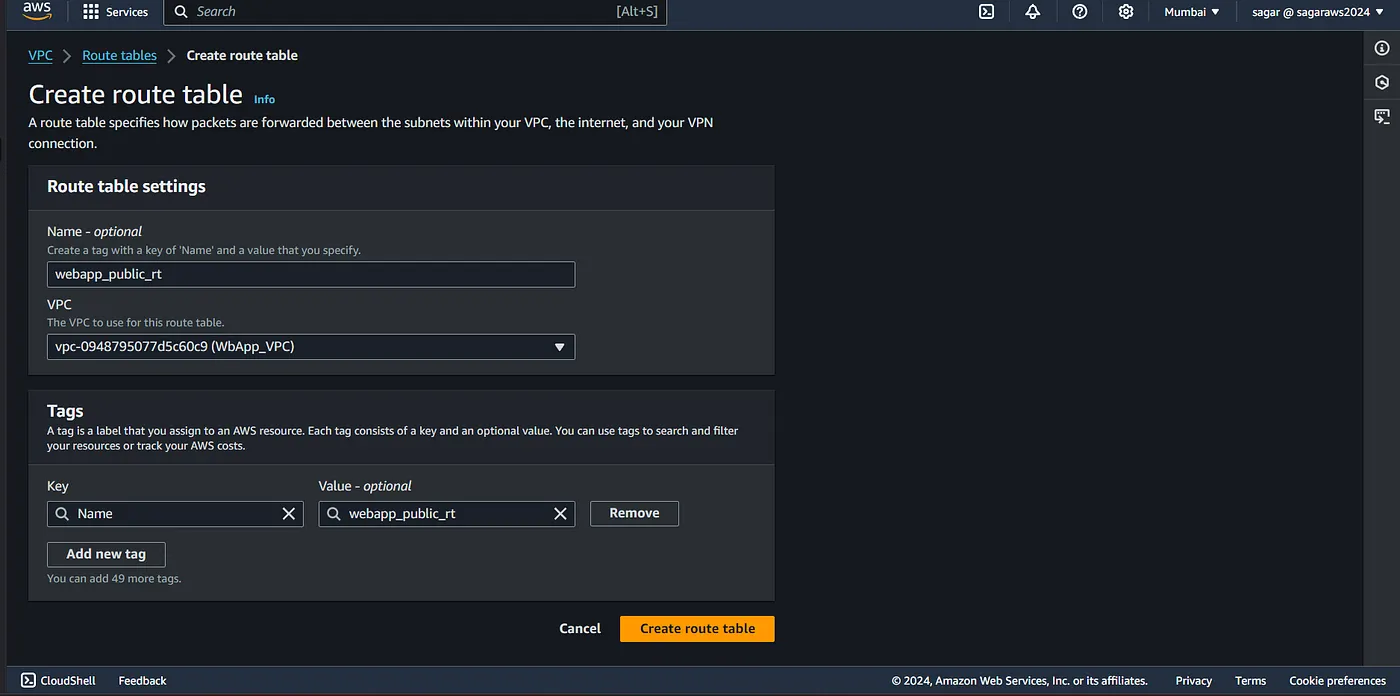
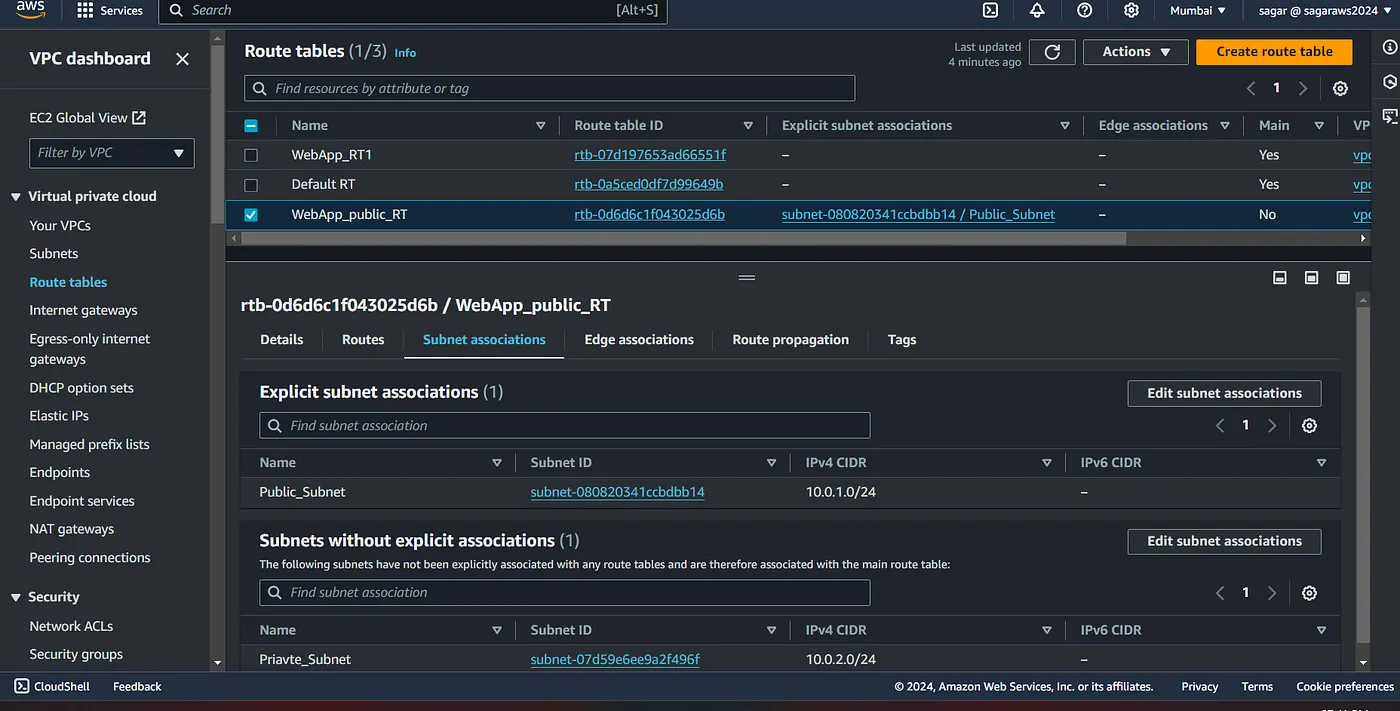
So lets create another RT, and associate it to one subnet which we wish to be public.
We still need to assiciate it to the subent.
Click on action - edit subnet association and then select the one you want to make public.
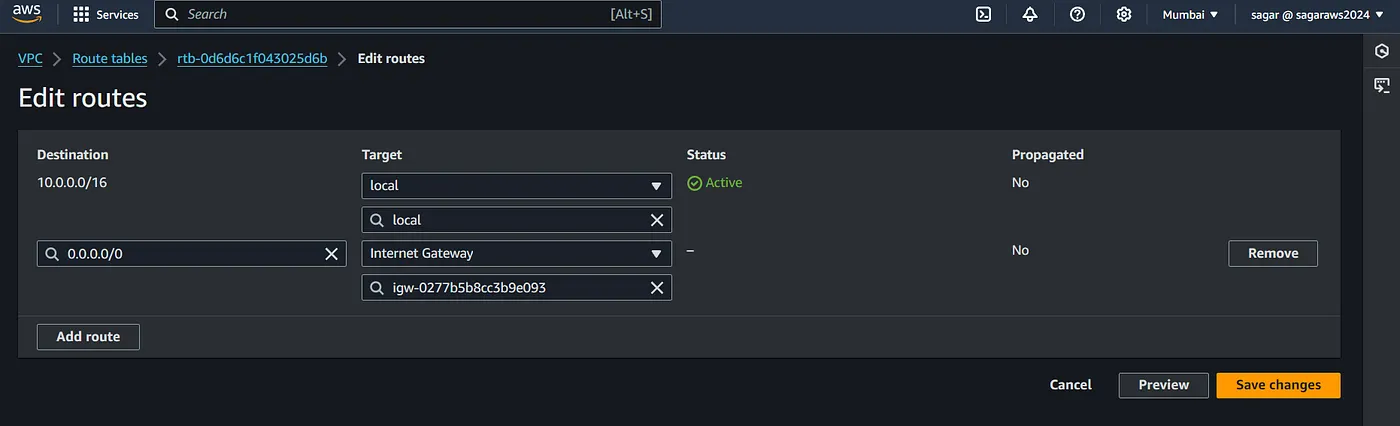
Now, we need to update the routes of the subnet, Click on routes, then edit routes and add route.
Select 0.0.0.0/0 from the drop down, select the internet gateway from the drop down and choose your igw and save.
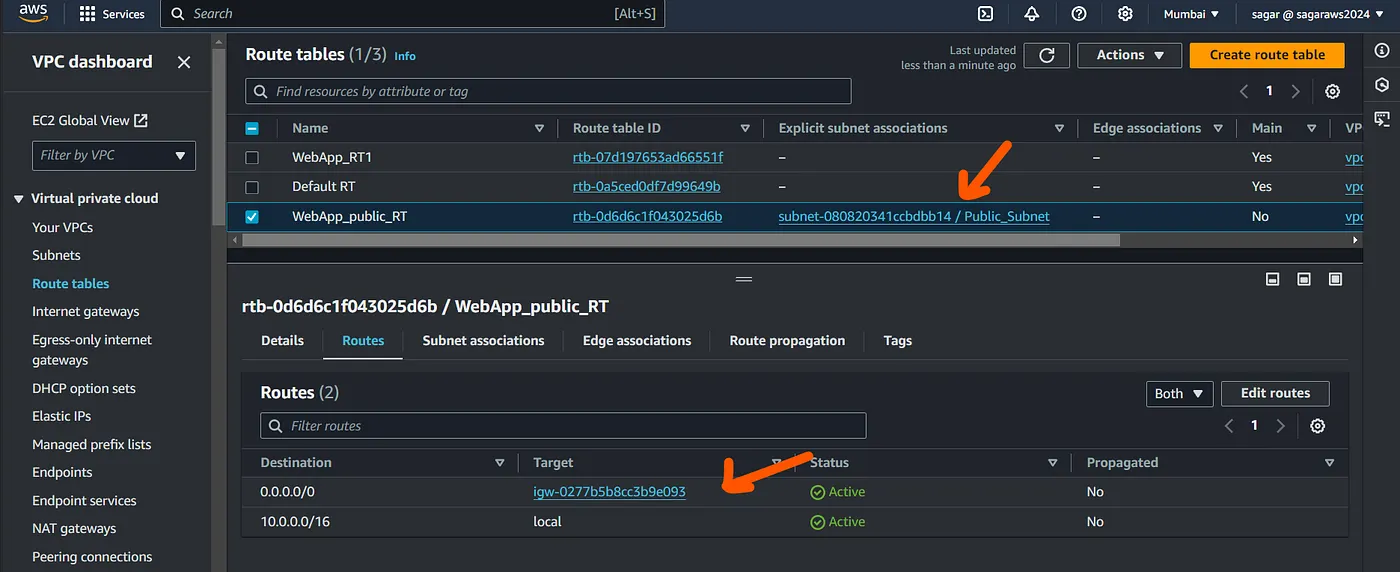
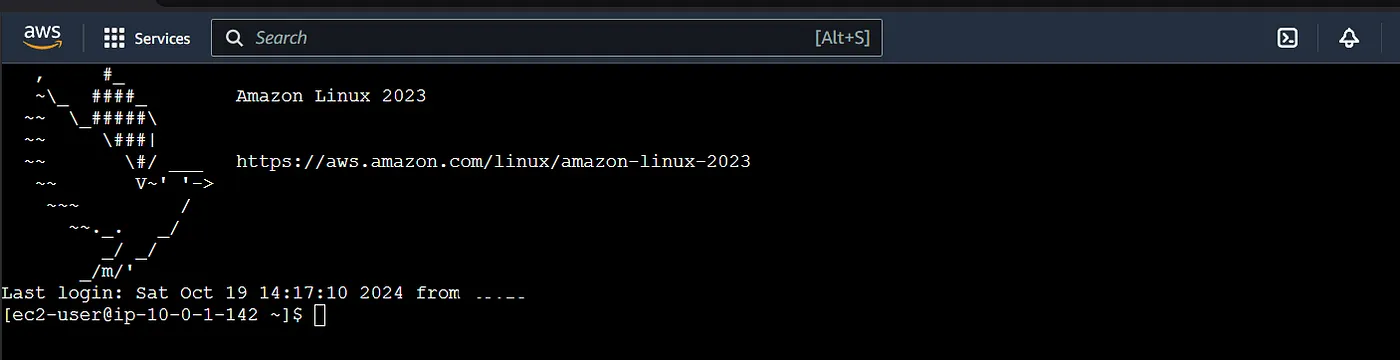
Lets try ssh again and here are go.
Create another vm in private subnet and test it, we still should not be able to ssh into it.


You can skip assigning public ip to the instance in private subnet. I added it just to be able to view the above message.
You can access an EC2 instance in a private subnet using a bastion host (jump server). Alternatively, if you want the instance to access the internet for outbound traffic (say to update the repo cache or install any DB server), you would use a NAT gateway, but this won’t allow inbound internet access to the instance itself. We’ll cover NAT gateways in more detail later.
Alright. So that’s all. Now lets automate this lengthy process with Terraform/OpenTofu.
Automation using OpenTofu:
We follow the same approach. Create VPC, create 2 subnets in two diff AZs, create an IGW, add tags to the default rt, associate igw with vpc, subnet, edit routes for igw destination.
- Data source to filter the main RT which is created automatically with the vpc, we’ll tag it later. Also getting the ami of az linux 2023 to be used in ec2 creation
- All the resources creation and association. Tagging the main rt with null resources and creating VMs by fetching data from data.tf
- Printing the outputs with output.tf
Wrap Up
In this article, we’ve walked through the process of setting up an AWS VPC both manually and through Terraform. Understanding the manual setup helps you grasp the core networking components, while using Terraform simplifies and automates the deployment, making it more efficient and scalable. Whether you prefer hands-on configuration or automation, you now have the tools to build and manage your AWS VPC with confidence.
Be sure to delete/destroy resources once you are done with the experiment.
In future articles we’ll learn more about NAT gateway, bastion host, VPC peering and other features of VPC.
Read more on AWS and Terraform: